Custom Roller Shutter Widget: A Comprehensive Guide
Hi everyone,
I’m thrilled to share my latest project—a custom roller shutter widget designed for OpenHAB. This widget has been a labor of love, combining both functionality and user-friendliness. Let me walk you through the journey, the features, and how you can implement it in your setup.
The Vision
The goal was to create a widget that offers three main controls within a compact space:
- Up/Down/Stop Controls: For precise movement control.
- Exact Position Control: Using a slider for precise positioning.
- Preset Controls: Allow users to save and apply favorite positions effortlessly.
Additionally, I wanted a visual indicator to show when the shutter is moving, which is especially useful for devices that don’t update their position until they’ve stopped.
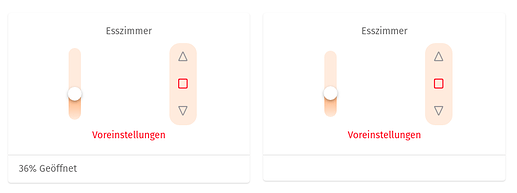
Features in Action
Here’s a glimpse of what the widget offers:
On an Android Phone (Dark Mode)

Two widget instances side by side, showing the movement indicator on the left.
On the Desktop
The widget in desktop view, showcasing the preset popover.
How It Works
The widget is designed with flexibility in mind. Here’s a breakdown of the essential components:
Configuration Options
- Control Item: Sends UP, DOWN, or STOP commands to the roller shutter.
- Position Item: Receives exact position commands (0-100).
- Movement Indicator: Shows when the shutter is moving. This is triggered by an expression, such as monitoring current consumption.
- Preset Configuration: Saves and applies favorite positions. Presets can be shared across multiple shutters or kept per shutter.
Scripting
To manage presets, two scripts are used:
- Add Preset Script: Adds a new preset to the list, ensuring no duplicates and sorting them numerically.
- Delete Preset Script: Removes a preset from the list, with safeguards to prevent accidental deletions.
Installation Steps
- Add the Widget: Copy the widget code into your OpenHAB’s developer tools under the widgets section.
- Configure Items: Set up the necessary items for control, position, movement, and presets.
- Implement Scripts: Create the scripts for adding and deleting presets, ensuring they reference the correct items.
- Localization: Customize translations for terms like “Presets,” “Apply,” “Add,” etc., to match your language.
Tips for Success
- Testing: Start with a single shutter to ensure everything works as expected before scaling up.
- Customization: Adjust the widget’s size and style to fit seamlessly into your existing UI.
- Documentation: Keep detailed notes on your setup, especially if you’re using custom expressions for the movement indicator.
Feedback and Improvements
I’m really happy with how this widget turned out, but I’m always open to suggestions! Whether it’s about adding new features, improving usability, or troubleshooting tips, your input is invaluable.
Let me know what you think and feel free to share your own custom widget projects. Happy automating!
Best regards,
[Your Name]