How to make the original bell ringing when press the G4/G410 doorbell

Starting from the G4 doorbell, we have received a lot of user feedback hoping to make the existing original doorbell ring at the same time when the doorbell button is pressed. I have provided a method below (of course, some professional users are already using through this method) and will show the detailed operation steps as follows:

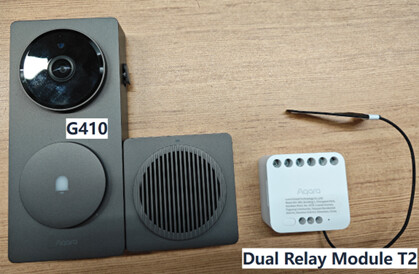
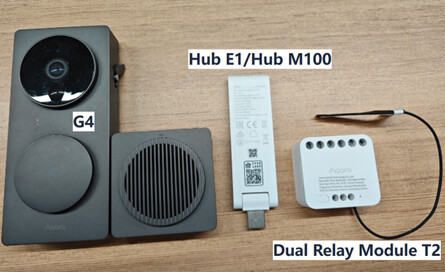
Step 1: Device Preparation. After purchasing the G4 or G410 doorbell, you need to purchase an additional Aqara Single Switch Module T1 (With Neutral) or Dual Relay Module T2. I have shown the devices that need to be prepared for G410 and G4 respectively in the following figure. As the G4 doorbell does not have Hub function, it requires an additional Aqara hub (recommended here are Hub E1 or Hub M100). If you have other Aqara hubs at home, you can also use them without additional purchase. The following content is based on the combination of G410 and Dual Relay Module T2 as an example.


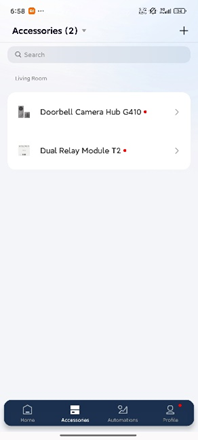
Step 2: Add devices. First, add the G410 doorbell to the Aqara Home app, and then bind the Dual Relay Module T2 to the indoor chime of G410.

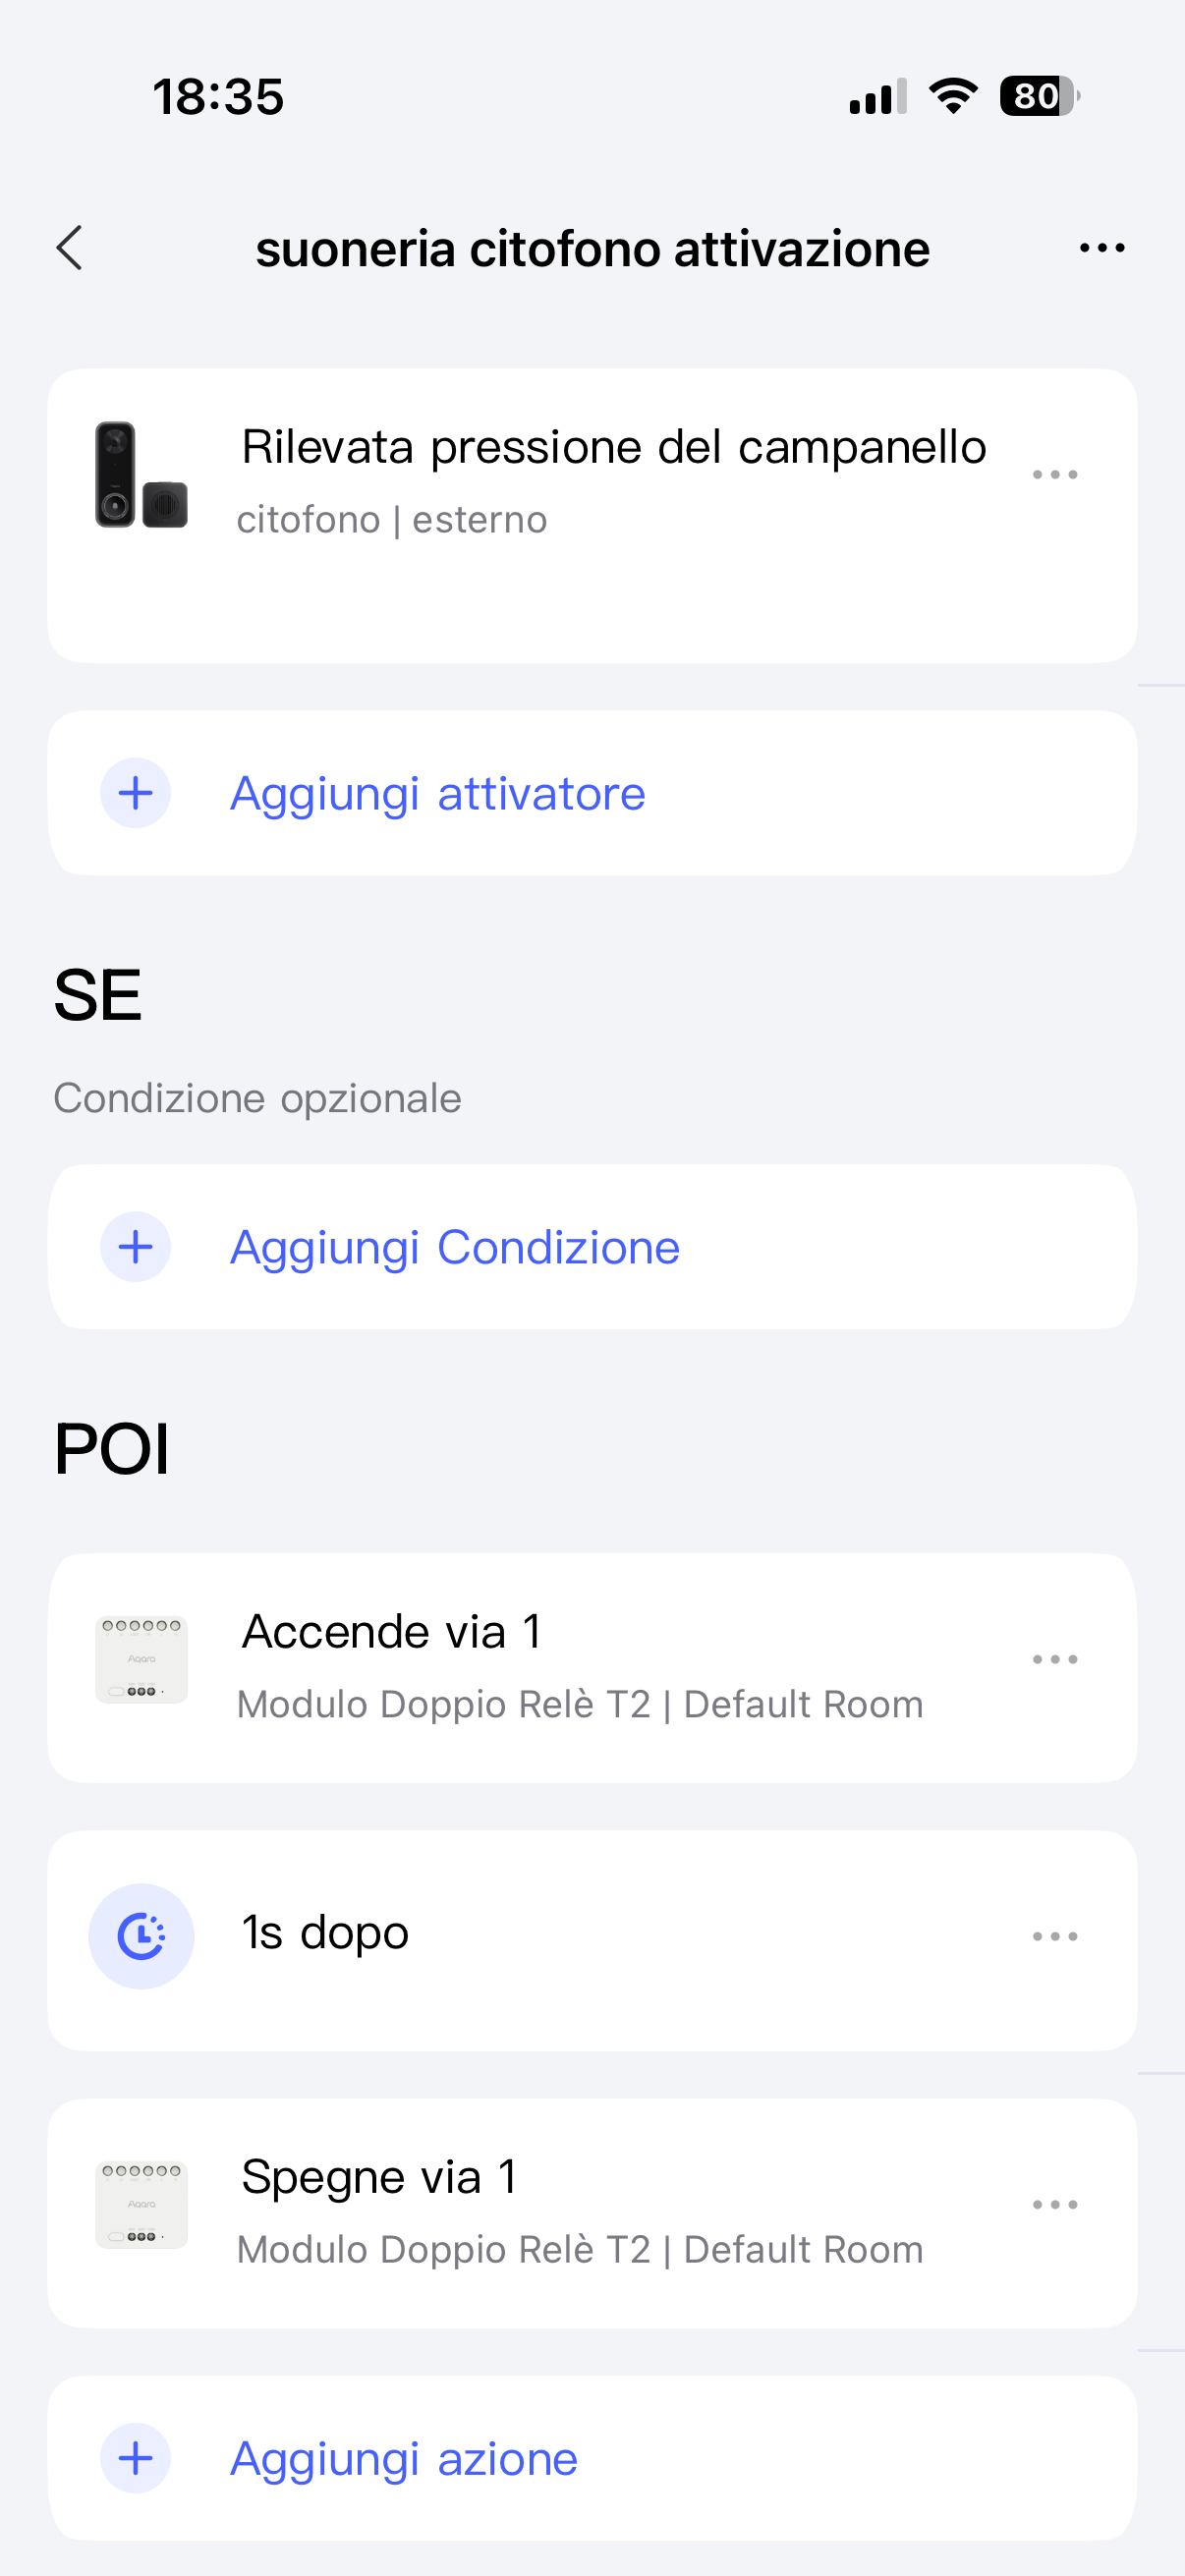
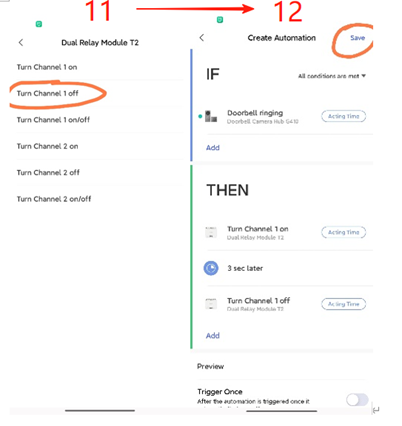
Step 3: Configure Automation: Complete the automation configuration as shown in the diagram below. Considering that most of users have never used Aqara’s automation configuration feature, I have taken detailed screenshots of the APP operation steps. In step 8, you can freely configure the duration of each continuous ringing of the original bell by setting different seconds.


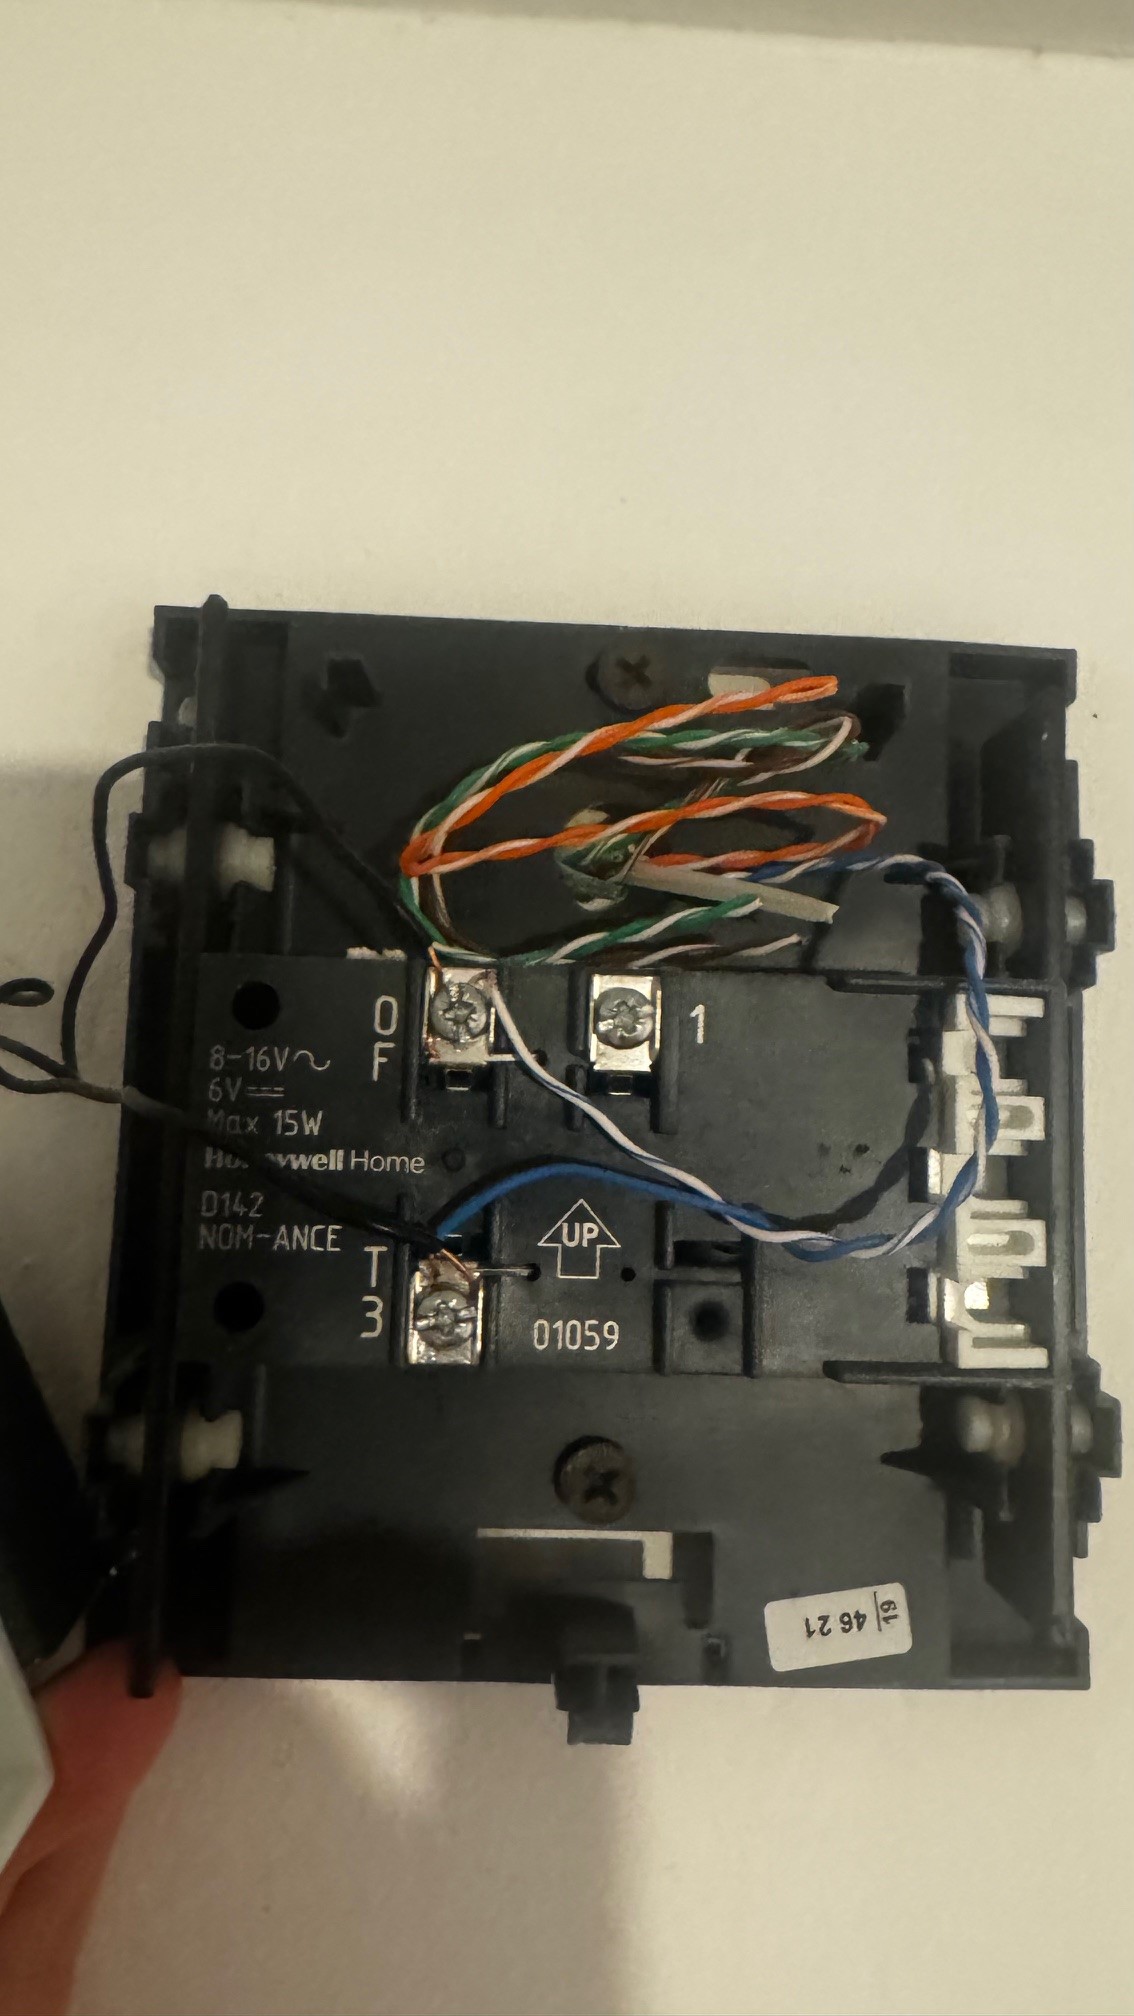
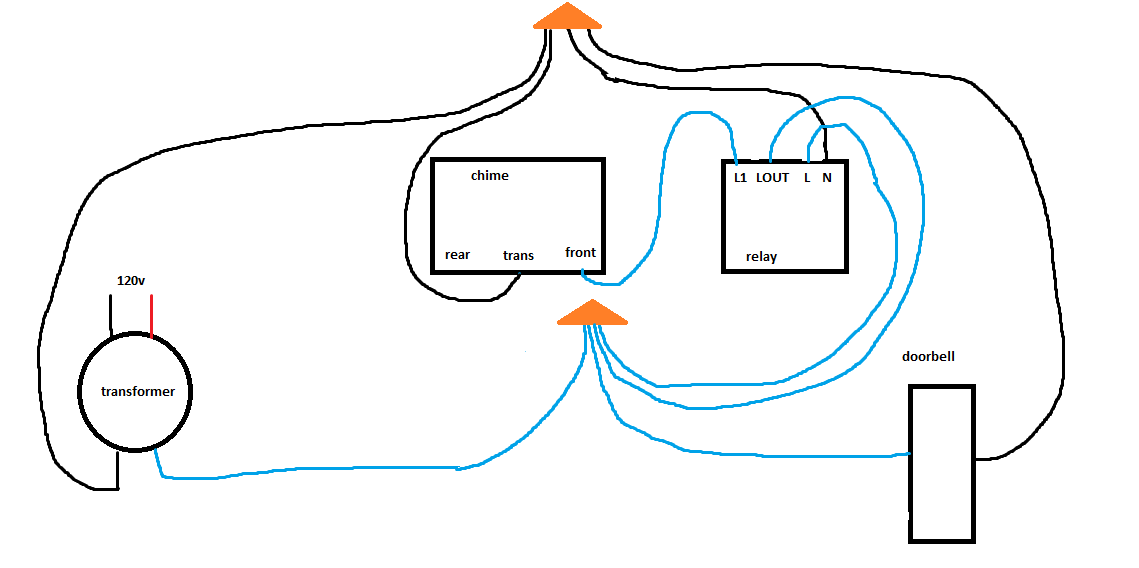
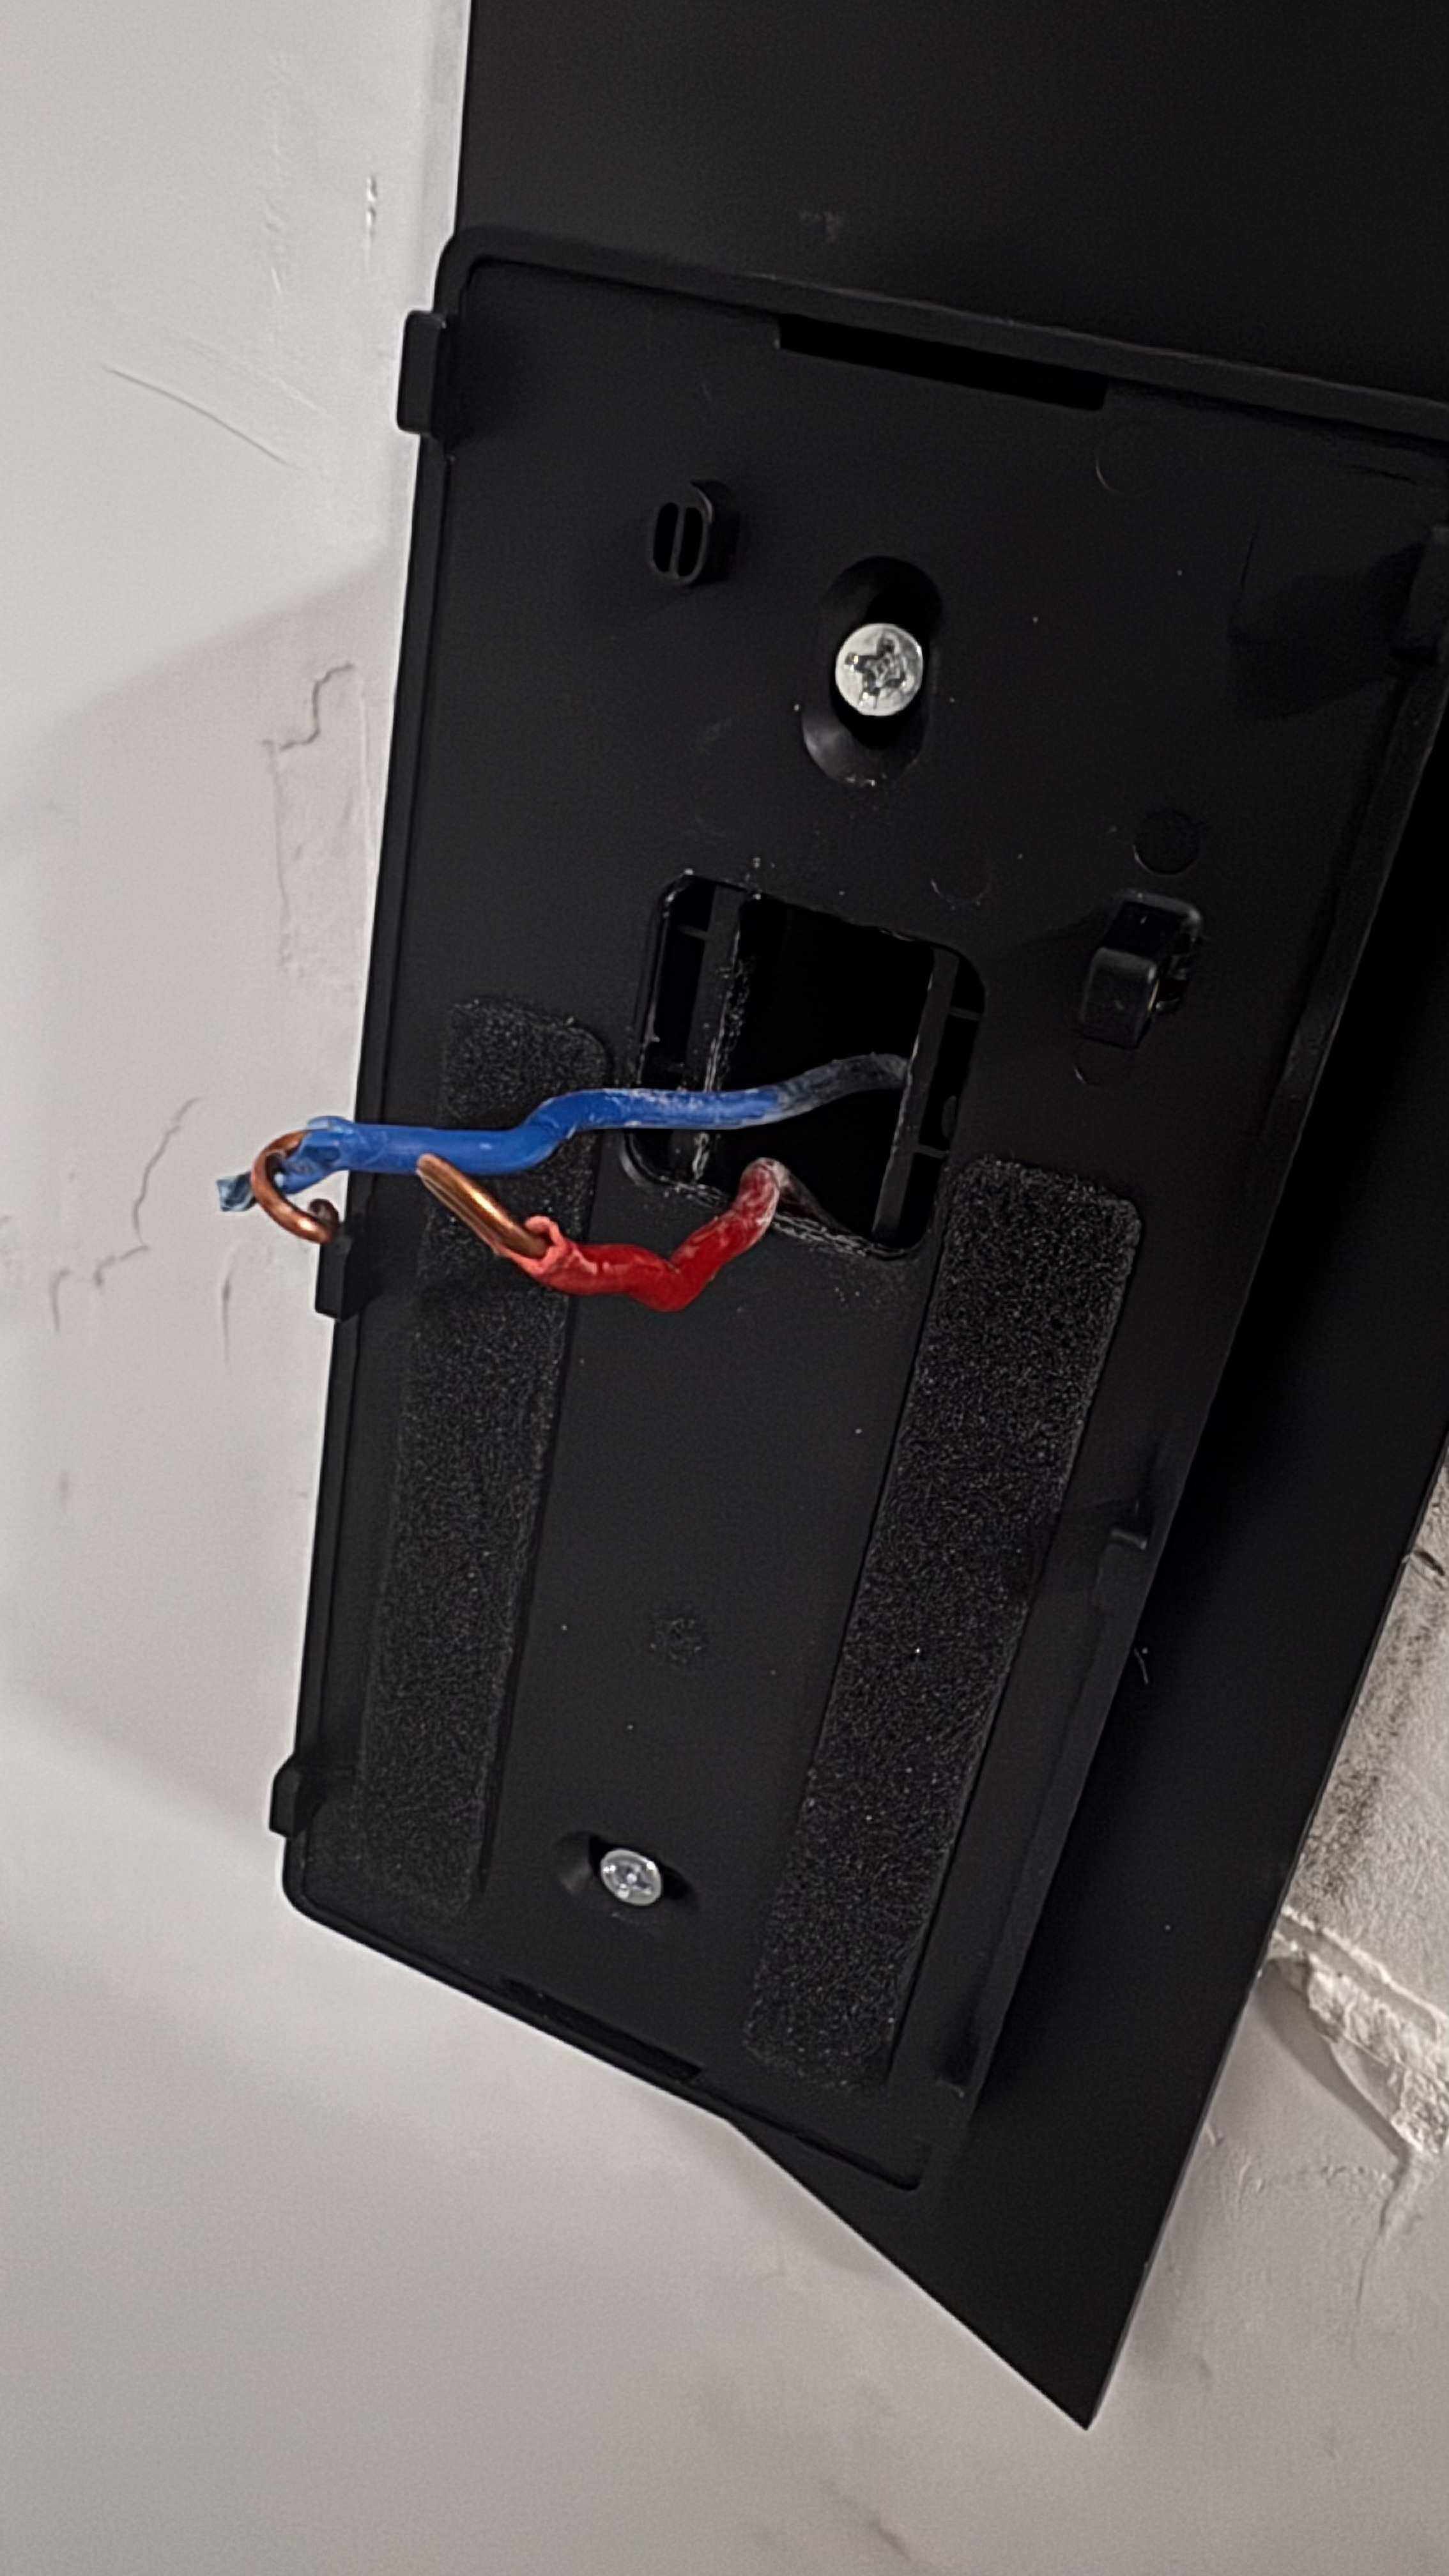
Step 4: Complete the wiring work of Dual Relay Module T2: Refer to the following diagram to complete the cable connection between the original bell and Dual Relay Module T2. This part of the operation involves strong electricity. If you are not a professional or know nothing about strong electricity installation, we strongly recommend that you consult or request the help of qualified personnel with relevant work qualifications.

At this point, you have completed all device configurations. When you press the G4/G410 doorbell, the original bell that already exists in your home will ring at the same time.

24 Likes

Addendum: In step 4, the cable connecting L1 and LOUT only needs to remove the mechanical button of the original doorbell and connect two of the cables to the Dual Relay Module T2 as shown in the diagram.

9 Likes

A video would be super helpful

7 Likes

That’s awesome. Thanks for breaking that down. I wouldn’t have thought to use the relay.

1 Like

Actually, the Dual Relay Module T2 can be replaced by a any normal Aqara Switch, but I think there will no people willing to waste a wall switch to do this, so the smaller size of Dual Relay Module T2 should be more suitable.

3 Likes

Is a good suggestion, due to I live in shenzhen, China, I can’t find a old model electric bell here. Next time, I will use a substitute to take an installation video with English subtitles.

4 Likes

So, if I understand correctly the relay T2 connects the home AC power circuit to the original door bell transformer. Is this correct?

I have been holding out for so long waiting for a HomeKit compatible doorbell with a method for operating my existing chime!
Unfortunately I had been tied to the original nest doorbell with a homebride connection as the only viable option.
Whilst the information may be a little more than I have used when trying to create automations; I feel like this is an investment I may need to consider given the awful build quality of the nest!

2 Likes

No, In fact, the AC power circuit is only used to drive T2 working and does not introduce current into the original doorbell circuit, as I recommend the use of “dry contact mode” (not “wet contact mode”, if you need to understand their differences, please refer to the detailed manual of T2)

1 Like

Thanks for this.

A few more questions, maybe North American wiring is different than other places.

Typically a doorbell chime will be wired such that the doorbell is given 16-24vAC in one wire and the other wire goes to the chime, and then the chime connects the return. When hon press the doorbell we connect the 16-24vac to the chime.

It’s not clear how dry mode wiring would help us in this instance, or is it ok to pass this voltage/current of the chime through the dry contacts?

Secondly, it’s unclear where to source the 120v portion of the diagram.

Is it possible to power this off the 16-24vac as well? I know this might mean upgrading the transformer to provide more current ?

Finally, how does this work in association with a wired g4/g410 doorbell.

Can the transformer hot go to the doorbell relay power, and one side of the dry relay, and then the transformer return go to the doorbell, relay power, and one side of the chime. And then the power side of the chime be connected to the other dry relay contact?

Hi,
i ended up in this article while looking if it is possible to use my existing chime and wanted to see if you have a good idea.
existing installation: have a netatmo smart doorbell installed with a traditional chime. Netatmo provide a small chime module to avoid having the chime ringing constantly. The wiring is like you see in the image, blue white cables come from the doorbell and the 2 small black ones are from the chime module. So when the doorbell is pressed the chime module allows the current to go also in the traditional chime and it rings
Future: Want to replace the netatmo with a G410 doorbell
Can i use the dual relay module or the single switch module to achieve the same result? Do i need external power to have any of the 2 modules from Aqara being able to work or can also just be in between and having the existing chime ring with an automation when the button is pressed? If it is possible, any suggestions for the wiring?


thank you

I got my chime ringing with the G410 and the T2 relay. Standard North American doorbell wiring.

First, I suggest running a mechanical ding-dong chime running off a 16V/30VA transformer. It will regulate to something around 17.5V no-load unless you have poor/weird wiring and it will voltage sag to around 16.7V when the mechanical chime rings. A 24V transformer will slowly burn the coils in most chimes. We want the 30VA minimum so the G410 doesn’t reboot when the chime rings.

Standard NA wiring is usually in a loop with the doorbell as a switch: 120V mains → transformer → one leg to chime TRANS lug, second leg to doorbell → doorbell return wire back to the chime FRONT lug. With a good transformer we can power it all off the 16V line. If you have cat5/6 instead of 18awg wire, then I suggest pairing up twisted pairs since that’s a very thin gauge and will stress things more (so for example treat orange and striped orange as 1 wire).

Here we go.

Step 1: kill power to circuit and check with voltmeter that there is no voltage across the transformer.
Step 2: remove the chime from the loop by tying the wires going to the chime TRANS/FRONT lugs together. If you were to flip the power back on, the doorbell should boot up normally, but the chime needs switched power now.
Step 3: Bring either 16VAC, 24VAC, or 120VAC to the Aqara T2 relay L and N lugs. You can use your transformer power if it is a good transformer, as I outlined earlier.
Step 4: flip on power and check the relay boots up and can be added as an accessory. If it fails to turn on from the transformer power, you probably need a better transformer, or just power the relay off mains. Go into the relay settings when it is added and change it to SWITCH DISABLED mode and to DRY CONTACT - PULSE mode 300ms delay.
Step 5: kill power again
Step 6: run an 18 AWG bell/thermostat wire from L1 lug on the relay to the chime FRONT lug.
Step 7: run another 18 AWG wire from the LOUT lug on the relay to the first leg of the 16V power source.
Step 8: run a last 18 AWG wire from the TRANS chime lug to the other leg of the 16V line.

Make sure none of the wires from the doorbell are attached to the chime. We do NOT want the chime in series with the doorbell since the Aqara doesn’t have an adapter like Nest and Ring do which modulate voltage and backfed EMF from the chime coils. Again, make sure you are wired in parallel to protect your doorbell from the chime voltage spike.

When you power everything back up, first verify the relay is in DRY CONTACT PULSE mode. If it is, you can immediately test the relay by triggering the channel 1 switch in the app. A voltmeter across the transformer should verify it stays above 16V. If the voltage drops to nearly zero, then the relay is closed and not open, so triple check the relay is in DRY CONTACT PULSE operation. L1 and LOUT should have 16V differential when the doorbell is not ringing.

Lastly to automate this with the doorbell, just add a new automation with settings: WHEN doorbell ringing THEN relay channel 1 on/off. Verify the doorbell does not reboot or lose power, and verify that voltage does not sag too much when the chime rings. If you are using a digital chime and not a mechanical one, then you need to get a little more fancy with the relay since a digital chime needs to be powered for much longer.

1 Like

Thank you for the detailed response, friend. The original content of this topic was created by me, but it is much worse than the description by you. This is due to my lack of understanding of the actual wiring of doorbells in North American households. In your response, I saw several key points:

  1. You mentioned that Chime’s power supply and doorbell’s power supply need to use parallel circuits, which I think is crucial. I am also an electrical engineer and I fully agree with this suggestion;

  2. What shocked me a bit was that the L and N interfaces of T2 relay in this recommended circuit were driven by weak electricity (16 or 24V AC) after transformer voltage reduction. Our official parameters only indicate the low-voltage driving parameters of the DC power supply. After confirming with my hardware engineer, they believe that the low-voltage of AC voltage can also be driven, so this solution is reliable, but we recommend using at least an AC 24V power supply.

In summary, I recommend the JP1114’s solution, as I believe it has been designed from both the possibility of functional implementation and the reliability of the system, thanks again.

thank you for the detailed description and the diagram. I hope i dont fry anything but should be able to do it.
Time to get rid of Netatmo and move to Aqara :slight_smile:

I have an issue with the apartment chime that won’t stop ringing after doing the wiring and switching the power on. No matter how I swap the wires around, the chime that is installed into the fuse box won’t stop ringing as long as the fuse is turned on. Any help, advice? Thanks!

I tried to do this for the new doorbell g400 and a t2… replacing my old netatmo doorbell… but the automation don t work… my old chime doesn’t sound… what am I missing… is there a detailed scheme that I can follow please?

I will give this a shot with the g410 and the t2 relay that I have.