Here is a step-by-step guide on how to integrate the Aqara Camera Hub G3 into Home Assistant. This covers the basic HomeKit integration as well as advanced features (PTZ control) using the AqaraPOST add-on (third-party / by sdavides / not by Aqara).
1. Initial Setup in Aqara Home
The device should be initialised in the Aqara Home app before connecting to Home Assistant.
- Open the Aqara Home App.
- Tap the + icon (top right corner) → Add Accessory → Camera Hub G3.
- Follow the on-screen instructions.
- Enter your Wi-Fi credentials.
- Scanning the QR Code: The app will generate a QR code to show to the camera.
Tip: If you have trouble getting the camera to scan the QR code from your phone screen, take a screenshot of the code and display it on a larger monitor. This immediately resolves the scanning issue for me.
2. Integration via HomeKit
Once the Camera Hub G3 has been set up, it will be integrated into Apple Home and will need to be removed again for the time being.
To remove it, open the Apple Home app, go to Accessory Settings and select Remove Camera from Home.
Then please check your Home Assistant:
- Open Home Assistant.
- Navigate to Settings → Devices & Services.
- The G3 should be automatically discovered by the HomeKit Device integration.
If not discovered: Click “Add integration” → Search for “Apple”
→ Select “Apple” and “HomeKit Device” - Enter the HomeKit Pairing Code found on the base of the camera.
3. Enable Advanced Features (PTZ & Controls)
To get PTZ (Pan/Tilt/Zoom) controls and better streaming, we will use a custom Add-on.
Prerequisites
Home Assistant Community Store (HACS) must be installed.
Installation Guide
Step 3.1 - Install Dependencies
- Open HACS in Home Assistant.
- Search for and download the following two integrations:
WebRTC CameraNode-RED Companion
- Restart Home Assistant if prompted.
Step 3.2 - Install the AqaraPOST Add-on
- Go to Settings → Add-ons → Add-on store (Button).
- Click the three dots (top right) → Repositories.
- Add the following URL:
https://github.com/sdavides/AqaraPOST-Homeassistant - Click + Add.
- Find the new Add-on in the list and click Install (Button).
- Optional: Enable “Start on boot” and “Watchdog”.
4. Obtaining the Device ID (“did”) & Configuration
To configure the Add-on, you need the unique did of your camera.
You can obtain this in two ways:
Option A: Manual Entry (via MAC Address)
You can find the MAC address of your camera via your router interface or in the Aqara Home app under Device settings → Network Information
Then you can construct the did yourself. The format is simply lumi1. followed by the MAC address in lowercase and without colons.
Format: lumi1.macaddress
Example: If your MAC is 54:EF:44:11:22:33, your did is lumi1.54ef44112233.
Option B: Retrieval via Docker Script
If you do not know the MAC address or would prefer to retrieve the exact token, you can use a Docker script.
- Install Docker Desktop on your computer Download Link
- Create a file named
docker-compose.ymlwith the following content:
YAMLservices:
  aqara-generator:
    image: python:3-alpine
    container_name: aqara_token_gen
    stdin_open: true
    tty: true
    command: >
      sh -c "apk add --no-cache build-base
      && pip install requests pycryptodome requests-toolbelt
      && wget -q https:\\[remove]raw.githubusercontent.com/sdavides/AqaraPOST-Homeassistant/main/generatejson/AqaraPOST-tokenGenerator.py -O /tmp/TokenGenerator.py
      && ch[remove]mod +x /tmp/TokenGenerator.py
      && python3 /tmp/TokenGenerator.py"
Note: Please remove the text [remove]
- Open your Terminal/Command Prompt, navigate to the folder containing the file, and run:
docker compose run --rm aqara-generator - Wait for dependencies to install.
- Enter your Aqara Email/Username, Password, and Region when prompted.
- The script will list your devices. Look for your G3 Camera.
- Copy the value under
did(e.g.,lumi1.xxxxxxxxxxxx).
Security Disclaimer: I have reviewed the script at the time of writing, and it sends login data as a hash only to Aqara servers. However, as this is a third-party script, I cannot guarantee future safety. You can audit the code yourself here: AqaraPOST-tokenGenerator.py
Final Step: Configure the Add-on
- Back in Home Assistant.
- Go to the Configuration tab of the installed AqaraPOST Add-on.
- usernameAqara: Your Aqara email.
- passwordAqara: Your Aqara password.
- Lumi1Aqara G3 camera: Paste the
did(from Option A or Option B). - serverAqara: Select your region. For example: “EU”
- timezoneAqara: Select your timezone. For example: “de-DE”
- Click Save and start the Add-on.
5. Creating the Dashboard Card
To view the stream and control the camera, add a custom card to your dashboard.
- Go to your Dashboard → Edit Dashboard.
- Choose Add Card (plus symbol)
- Scroll down to Manual.
- Paste the following YAML configuration:
YAMLtype: picture-elements
camera_image: camera.camera_hub_g3_1765
camera_view: auto
elements:
  - type: custom:webrtc-camera
    entity: camera.camera_hub_g3_1765
    style:
      top: 50%
      left: 50%
      width: 100%
      height: auto
      z-index: 0
    ui: false
  - type: state-icon
    entity: binary_sensor.camera_hub_g3_1765_motion_sensor
    style:
      left: 25px
      bottom: 0px
  - type: icon
    icon: mdi:arrow-up
    style:
      background: rgba(255, 255, 255, 0.25)
      right: 25px
      bottom: 50px
      z-index: 1
    tap_action:
      action: call-service
      service: button.press
      target:
        entity_id: button.camera_g3_ptz_up
  - type: icon
    icon: mdi:arrow-down
    style:
      background: rgba(255, 255, 255, 0.25)
      right: 25px
      bottom: 0px
    tap_action:
      action: call-service
      service: button.press
      target:
        entity_id: button.camera_g3_ptz_down
  - type: icon
    icon: mdi:arrow-left
    style:
      background: rgba(255, 255, 255, 0.25)
      right: 50px
      bottom: 25px
    tap_action:
      action: call-service
      service: button.press
      target:
        entity_id: button.camera_g3_ptz_left
  - type: icon
    icon: mdi:arrow-right
    style:
      background: rgba(255, 255, 255, 0.25)
      right: 0px
      bottom: 25px
    tap_action:
      action: call-service
      service: button.press
      target:
        entity_id: button.camera_g3_ptz_right
  - type: icon
    icon: mdi:arrow-collapse-all
    style:
      background: rgba(255, 255, 255, 0.25)
      right: 25px
      bottom: 25px
    tap_action:
      action: call-service
      service: button.press
      target:
        entity_id: button.camera_g3_ptz_center
You must replace the entity IDs in the code above with the actual names generated in your system:
- Replace
camera.camera_hub_g3_1765with your camera entity. - Replace
binary_sensor.camera_hub_g3_1765_motion_sensorwith your motion sensor entity. - The button entities (e.g.,
button.camera_g3_ptz_up) usually follow a standard naming convention, but check your Developer Tools if they differ.
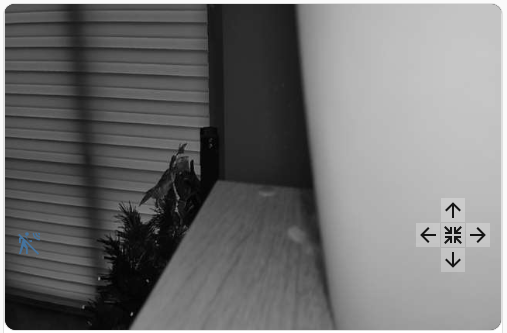
Once saved, you should see the live camera feed with an overlay of arrow keys for PTZ control and a motion sensor icon that changes color when movement is detected.
6. (Optional) Re-adding the Camera to Apple Home
Since Home Assistant “claimed” the direct HomeKit connection in Step 2, the camera is no longer visible in Apple Home. To use it in both Home Assistant and Apple Home, you must bridge it back.
- In Home Assistant, go to Settings → Devices & Services.
- Click Add Integration
- Search for HomeKit Bridge
- Select Apple → HomeKit Bridge.
- In “Select domains to be included” choose the Camera
- Click Submit. Read the instructions. Click Submit again.
- Give the HomeBridge a name. Optionally, select an area. Click Finish.
- Check the Notifications (sidebar, bottom left) in Home Assistant.
A new QR code will be generated. - Open the Apple Home App → Add Accessory
- Scan the QR code or enter the numerical code.
- You will likely see a warning stating “Uncertified Accessory” (since it is running through a software bridge). Tap Add Anyway to proceed.
The camera will now be available in Apple Home while remaining fully integrated into Home Assistant.
Appendix: List of Entities
Once the integration is complete, multiple entities will be created in Home Assistant. Below are examples of the primary entities for the Camera Hub G3. Since I also configured an Aqara FP2 Presence Sensor using this method, I have included those entities in the list as well. Please note that the ID suffixes (e.g., _1765) will be unique to your specific device setup.
camera.camera_hub_g3_1765(Main Video Feed)binary_sensor.camera_hub_g3_1765_motion_sensor(Motion Detection)button.camera_g3_ptz_left(PTZ Control: Move Left)
Click here for the full list of G3 and FP2 entities.
sensor.camera_g3_config(Camera G3 config)button.camera_g3_info(Camera G3 Info)button.camera_g3_config(Camera G3 config)sensor.aqara_smart_log_autom(Aqara Smart log Autom)button.aqara_smart_log_autom(Aqara Smart log Autom)button.camera_g3_ptz_left(Camera G3 PTZ left)button.camera_g3_ptz_right(Camera G3 PTZ right)button.camera_g3_ptz_up(Camera G3 PTZ up)button.camera_g3_ptz_down(Camera G3 PTZ down)switch.camera_g3_video_active(Camera G3 video active)switch.camera_g3_human_tracking(Camera G3 Human tracking)switch.camera_g3_pets_tracking(Camera G3 Pets tracking)switch.camera_g3_face_detection(Camera G3 Face Detection)switch.camera_g3_gesture_identification(Camera G3 Gesture Identification)switch.camera_g3_motion_detection(Camera G3 Motion Detection)switch.camera_g3_suond_detection(Camera G3 Suond Detection)switch.camera_g3_human_detection(Camera G3 Human Detection)switch.camera_g3_pets_detection(Camera G3 Pets detection)switch.camera_g3_timestamp(Camera G3 Timestamp)switch.camera_g3_frame(Camera G3 Frame)button.camera_g3_horizontal(Camera G3 Horizontal)button.camera_g3_upside(Camera G3 Upside)button.camera_g3_night_video_auto(Camera G3 Night Video Auto)button.camera_g3_night_video_off(Camera G3 Night Video Off)button.camera_g3_night_video_on(Camera G3 Night Video On)switch.camera_g3_mute_audio_rec(Camera G3 Mute audio rec)switch.camera_g3_gesture_need_face(Camera G3 Gesture Need Face)button.camera_g3_sensor_motion_low(Camera G3 Sensor Motion low)button.camera_g3_sensor_motion_medium(Camera G3 Sensor Motion medium)button.camera_g3_sensor_motion_hight(Camera G3 Sensor Motion hight)sensor.camera_g3_face_know(Camera G3 Face Know)button.camera_g3_face_know(Camera G3 Face Know)button.camera_g3_ptz_allup(Camera G3 PTZ allUP)button.camera_g3_ptz_alldown(Camera G3 PTZ allDOWN)button.camera_g3_ptz_allleft(Camera G3 PTZ allLEFT)button.camera_g3_ptz_allright(Camera G3 PTZ allRIGHT)button.camera_g3_ptz_center(Camera G3 PTZ Center)sensor.camera_g3_log(Camera G3 log)sensor.camera_g3_log_last1(Camera G3 log last1)sensor.camera_g3_log_last2(Camera G3 log last2)sensor.camera_g3_log_last3(Camera G3 log last3)button.camera_g3_log(Camera G3 log)sensor.aqara_userid(Aqara UserID)sensor.camera_g3_info(Camera G3 Info)button.camera_g3_indicator_light_on(Camera G3 Indicator light ON)button.camera_g3_indicator_light_off(Camera G3 Indicator light OFF)button.camera_g3_sensor_suond_medium(Camera G3 Sensor Suond medium)button.camera_g3_sensor_suond_low(Camera G3 Sensor Suond low)button.camera_g3_sensor_suond_hight(Camera G3 Sensor Suond hight)button.camera_g3_reboot(Camera G3 reboot)button.camera_g3_ptz_calibration(Camera G3 PTZ calibration)text.camera_g3_resourceid_query(Camera G3 resourceID query)sensor.camera_g3_resourceid_query(Camera G3 resourceID query)switch.camera_g3_gateway_deletion_prevention(Camera G3 Gateway Deletion Prevention)switch.camera_g3_device_offline_notification(Camera G3 Device Offline Notification)switch.camera_g3_ark_mode(Camera G3 Ark Mode)switch.camera_g3_automatic_unlocking(Camera G3 Automatic Unlocking)switch.camera_g3_power_off_ptz_memory(Camera G3 Power-off ptz-memory)button.aqara_my_device(Aqara My Device)sensor.aqara_mydevice(Aqara MyDevice)button.camera_g3_sensor_human_low(Camera G3 Sensor Human low)button.camera_g3_sensor_human_medium(Camera G3 Sensor Human medium)button.camera_g3_sensor_human_hight(Camera G3 Sensor Human hight)button.camera_g3_sensor_catdog_low(Camera G3 Sensor CatDog low)button.camera_g3_sensor_catdog_medium(Camera G3 Sensor CatDog medium)button.camera_g3_sensor_catdog_hight(Camera G3 Sensor CatDog hight)button.camera_g3_sensor_face_low(Camera G3 Sensor Face low)button.camera_g3_sensor_face_medium(Camera G3 Sensor Face medium)button.camera_g3_sensor_face_hight(Camera G3 Sensor Face hight)button.camera_g3_hand_one(Camera G3 Hand One)button.camera_g3_hand_both(Camera G3 Hand Both)switch.camera_g3_anti_theft_lock(Camera G3 anti-theft-lock)switch.camera_g3_anti_lost_not(Camera G3 anti-lost-not)switch.camera_g3_motion_rec(Camera G3 motion_rec)switch.camera_g3_motion_push(Camera G3 motion_push)switch.camera_g3_suond_rec(Camera G3 suond_rec)switch.camera_g3_suond_push(Camera G3 suond_push)switch.camera_g3_face_rec(Camera G3 face_rec)switch.camera_g3_face_push(Camera G3 face_push)switch.camera_g3_person_rec(Camera G3 person_rec)switch.camera_g3_animal_push(Camera G3 animal_push)switch.camera_g3_animal_rec(Camera G3 animal_rec)switch.camera_g3_person_push(Camera G3 person_push)button.camera_g3_ptz_stop(Camera G3 PTZ Stop)switch.camera_g3_sleep_mode(Camera G3 sleep_mode)button.aqara_fp2_config(FP2 Config)sensor.aqara_userid_fp2(Aqara UserID_fp2)sensor.aqara_fp2_config(FP2 Sensor Config)button.aqara_fp2_info(FP2 Button Info)sensor.aqara_fp2_info(FP2 Sensor Info)button.aqara_fp2_setting(Setting)sensor.aqara_fp2_setting(Setting)button.aqara_fp2_find_device(Find device)button.fp2_presence_detec_sens_hight(FP2 Presence Detec Sens Hight)button.fp2_presence_detec_sens_medium(FP2 Presence Detec Sens Medium)button.fp2_presence_detec_sens_low(FP2 Presence Detec Sens Low)button.fp2_proximity_sens_distance_medium(FP2 Proximity Sens Distance Medium)button.fp2_proximity_sens_distance_far(FP2 Proximity Sens Distance Far)button.fp2_proximity_sens_distance_close(FP2 Proximity Sens Distance Close)button.fp2_ai_person_detection_off(FP2 AI Person Detection Off)button.fp2_ai_person_detection_on(FP2 AI Person Detection On)button.fp2_anti_light_pollution_mode_off(FP2 Anti-light Pollution Mode Off)button.fp2_anti_light_pollution_mode_on(FP2 Anti-light Pollution Mode On)button.fp2_reversed_coordinate_direction_disable(FP2 Reversed Coordinate Direction Disable)button.fp2_reversed_coordinate_direction_enable(FP2 Reversed Coordinate Direction Enable)button.fp2_reversed_coordinate_direction_auto(FP2 Reversed Coordinate Direction Auto)button.fp2_detection_direction_left_right(FP2 Detection Direction Left-Right)button.fp2_detection_direction_default(FP2 Detection Direction Default)button.fp2_sleep_monitoring_sens_high(FP2 Sleep Monitoring Sens High)button.fp2_sleep_monitoring_sens_low(FP2 Sleep Monitoring Sens Low)button.fp2_sleep_monitoring_sens_medium(FP2 Sleep Monitoring Sens Medium)button.aqara_fp2_log(FP2 Button Log)sensor.aqara_fp2_log(FP2 Sensor Log)