Wow, got it — there are basically 3 core ways to approach Automation 2.0 configuration!

Hello everyone, the product management team of the Aqara Home App is working on an article to help explain how to configure automations. This is our first draft, and we’d love for you to take a look and let us know whether the explanations are clear. If anything is unclear or could be improved, please feel free to share your feedback and suggestions.

Here is the main text:
Below is a polished, natural English translation suitable for an article or community post. I’ve kept terminology precise and consistent with the smart-home automation context.


Automation conditions fall into two categories: transient trigger conditions and state conditions.
A transient condition can trigger an automation, while a state condition is used to evaluate whether the automation should proceed.

When configuring an automation, you may use only a transient trigger condition along with its effective time period. However, in most cases, we recommend combining transient and state conditions.
For example:

  • “Someone passed by” is a transient trigger condition.
  • “Illuminance is below 50 lux” is a state condition.
    If you set the rule as “turn on the light when someone passes by and illuminance is below 50 lux,” you effectively prevent the light from being triggered during the daytime by mistake.

Using only state conditions is not recommended. The system checks state conditions periodically, and whenever the condition is met, it reports the result, which may cause very frequent triggers.
A typical example of a state condition is a threshold like “higher than” or “lower than.”
For instance: “When the temperature detected by the sensor is above 30°C.”
If used alone, this condition may trigger continuous actions or notifications.
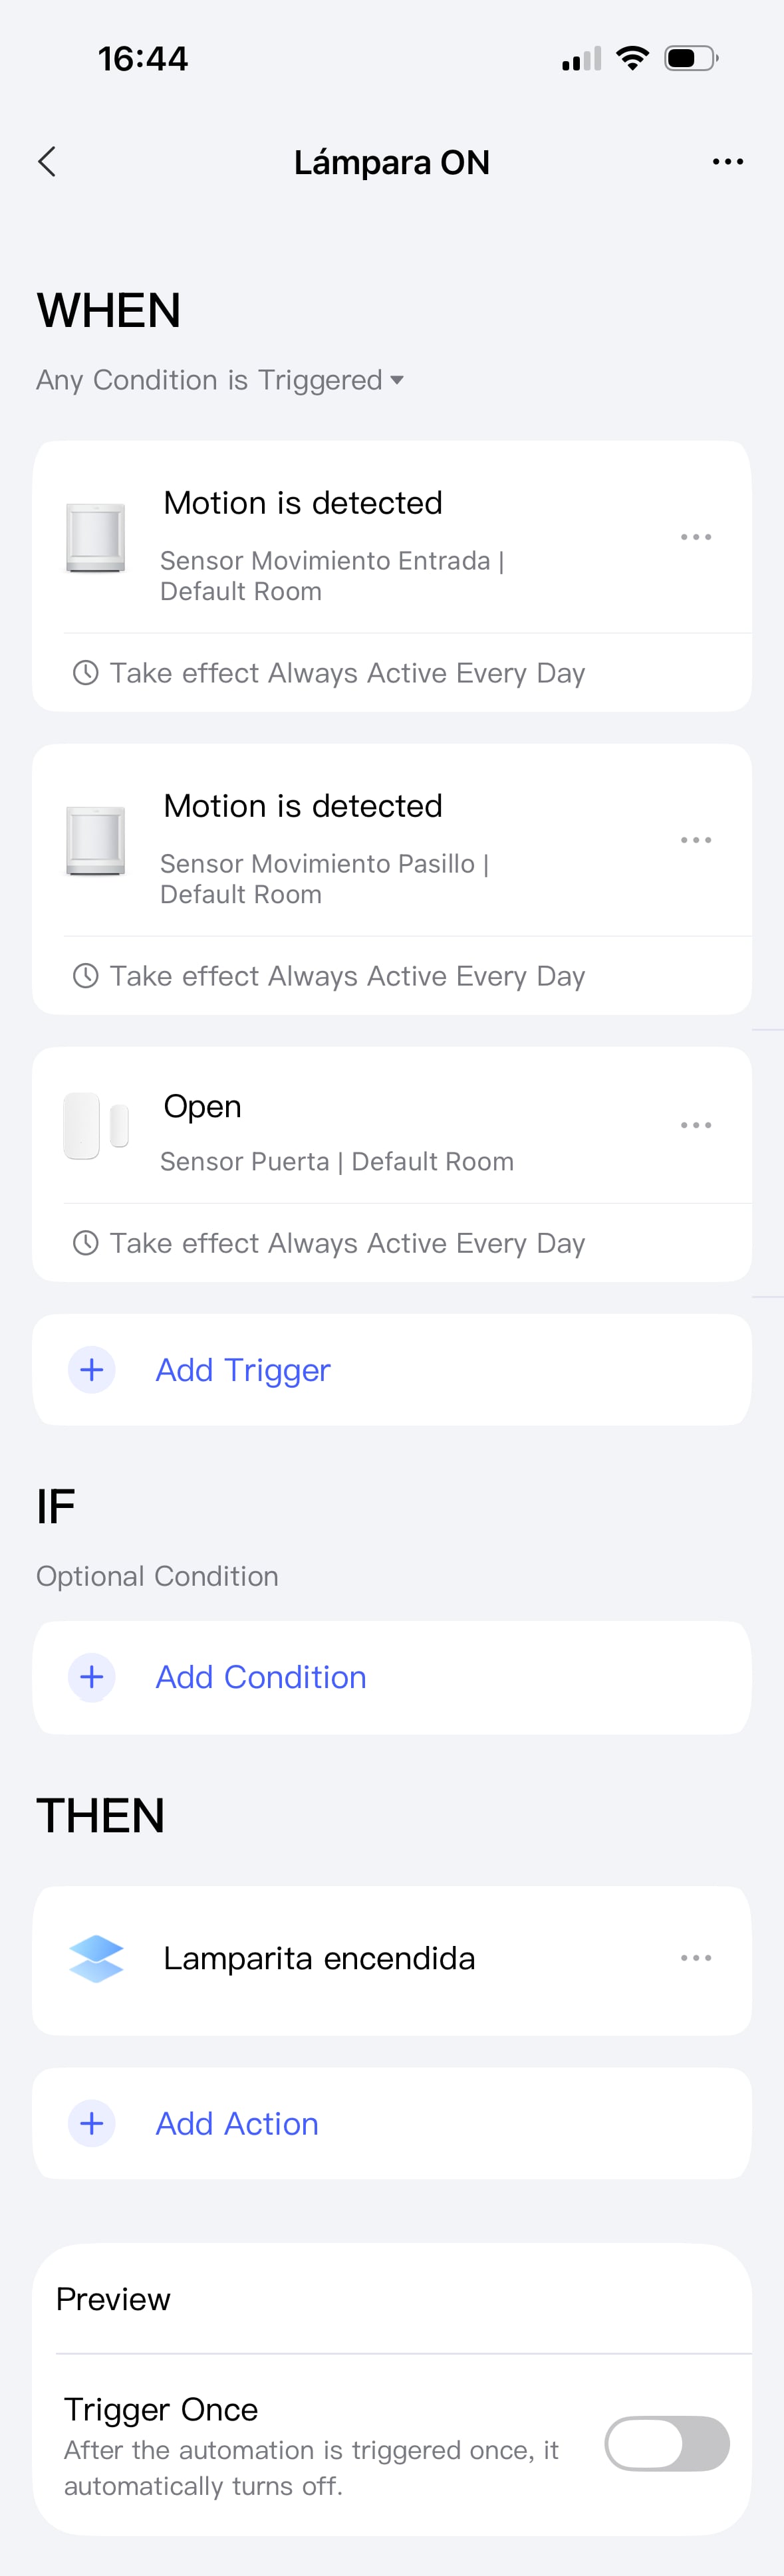

Usage Pattern 1

When: Trigger when a specific event occurs, when any event among several occurs, or when multiple events occur in sequence.
Then: Execute the action.

Example:
“When the camera detects an unfamiliar face, execute specific action commands.”


Usage Pattern 2

When: Defines when the system should perform the check.
If: Defines what conditions must be met for the action to run.
Then: Execute the action.

Example: a “late-night reminder.”
At 23:00 every night, if any light in the bedroom is still on, the hub plays a reminder: “It’s bedtime. Good night!”
If at 23:00 all lights are already off, it means the user is away or already asleep, so no reminder is needed.


A Special Case You Should Pay Attention To

If you want to create an automation that executes only when all conditions are met, you may notice a challenge:

  • WHEN does not support “match all conditions,”
  • Only IF supports “all conditions must be met,”
  • But WHEN is mandatory,
    So how should you configure this?

Let’s use a very common example:
“Turn off the lights when both Sensor A and Sensor B detect no presence.”

A common—but incomplete—setup is:

  • When Sensor A detects no one
  • If Sensor B also detects no one
  • Then turn off the lights

But this misses another possible sequence:

  • When Sensor B detects no one
  • If Sensor A also detects no one
  • Then turn off the lights

Some users may instead put everything in IF:
“If Sensor A detects no one AND Sensor B detects no one, then turn off the lights,”
and then become unsure what to put in WHEN.

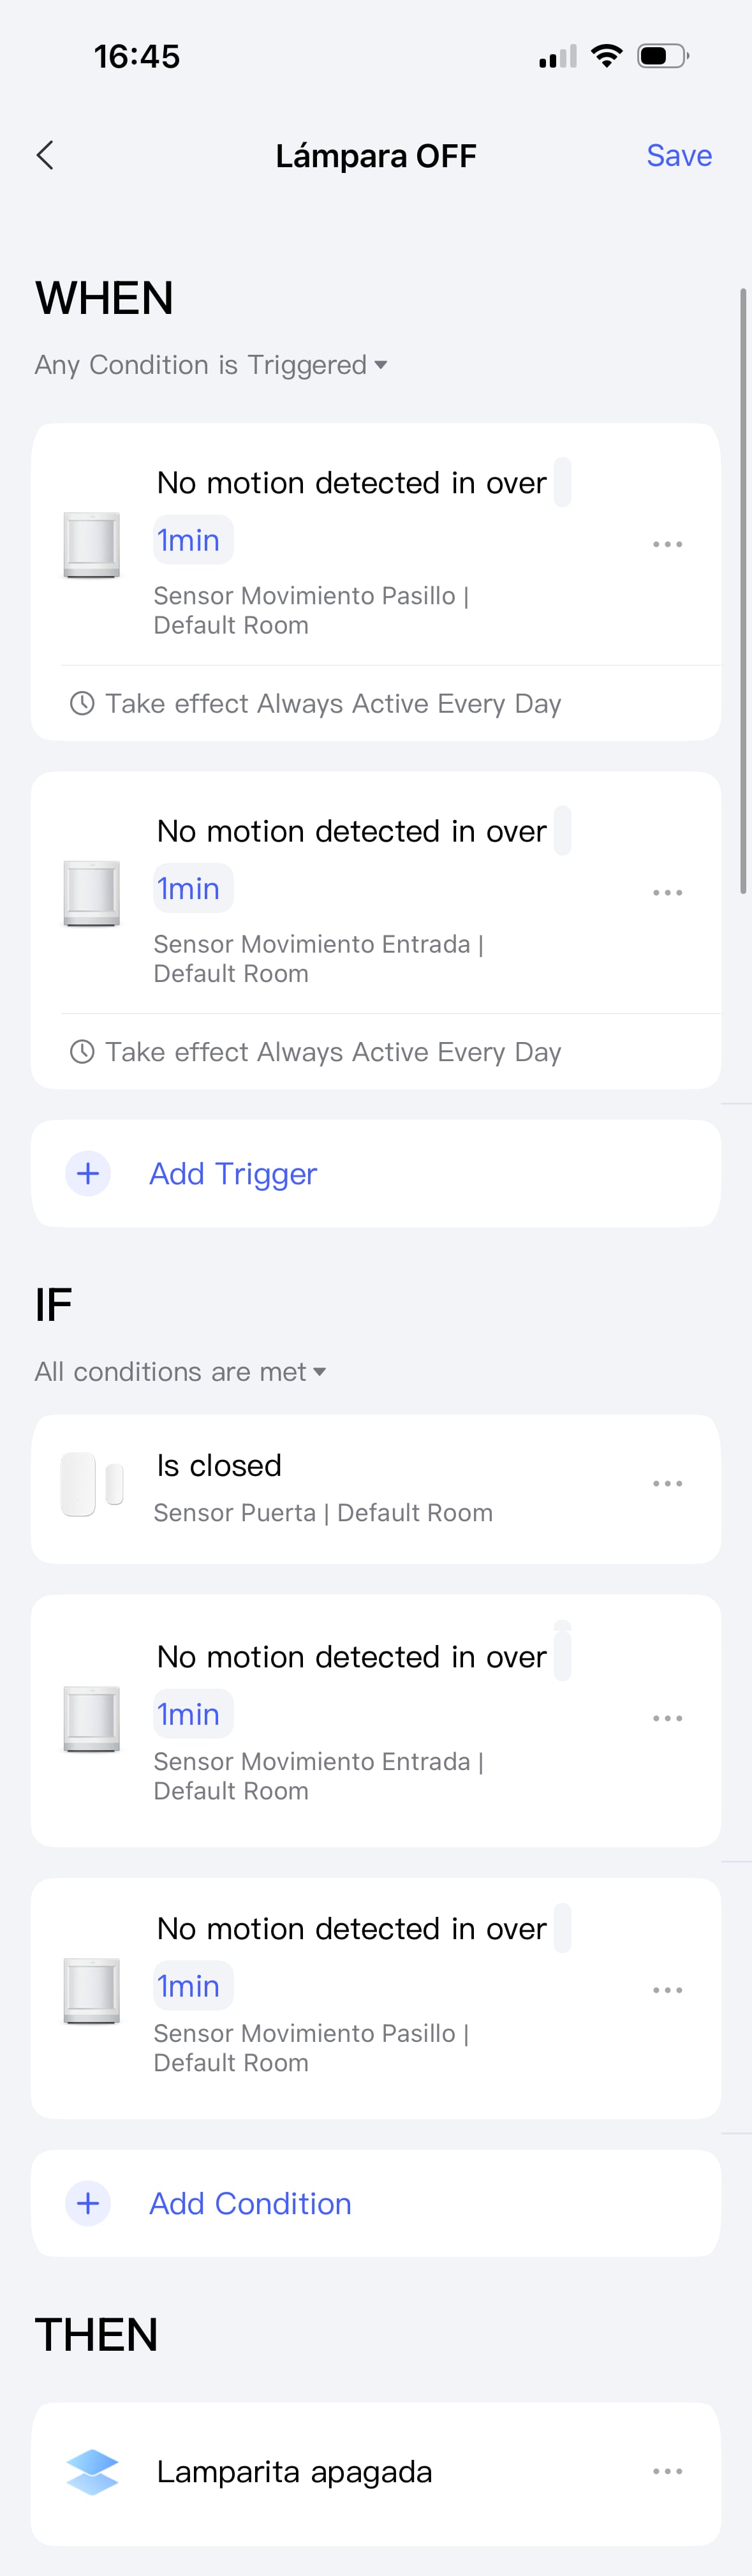
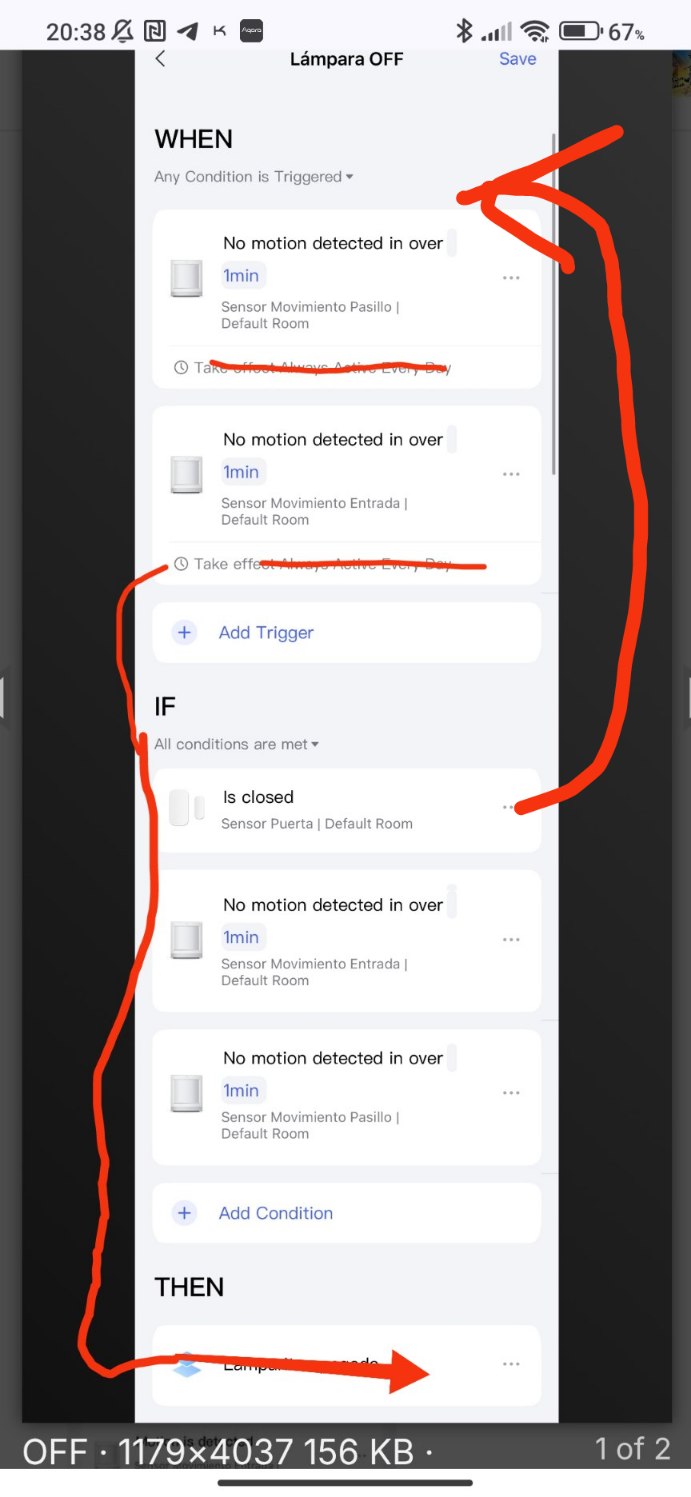
The correct configuration should be:

When (any of the following is met):

  • Sensor A detects no one
  • Sensor B detects no one

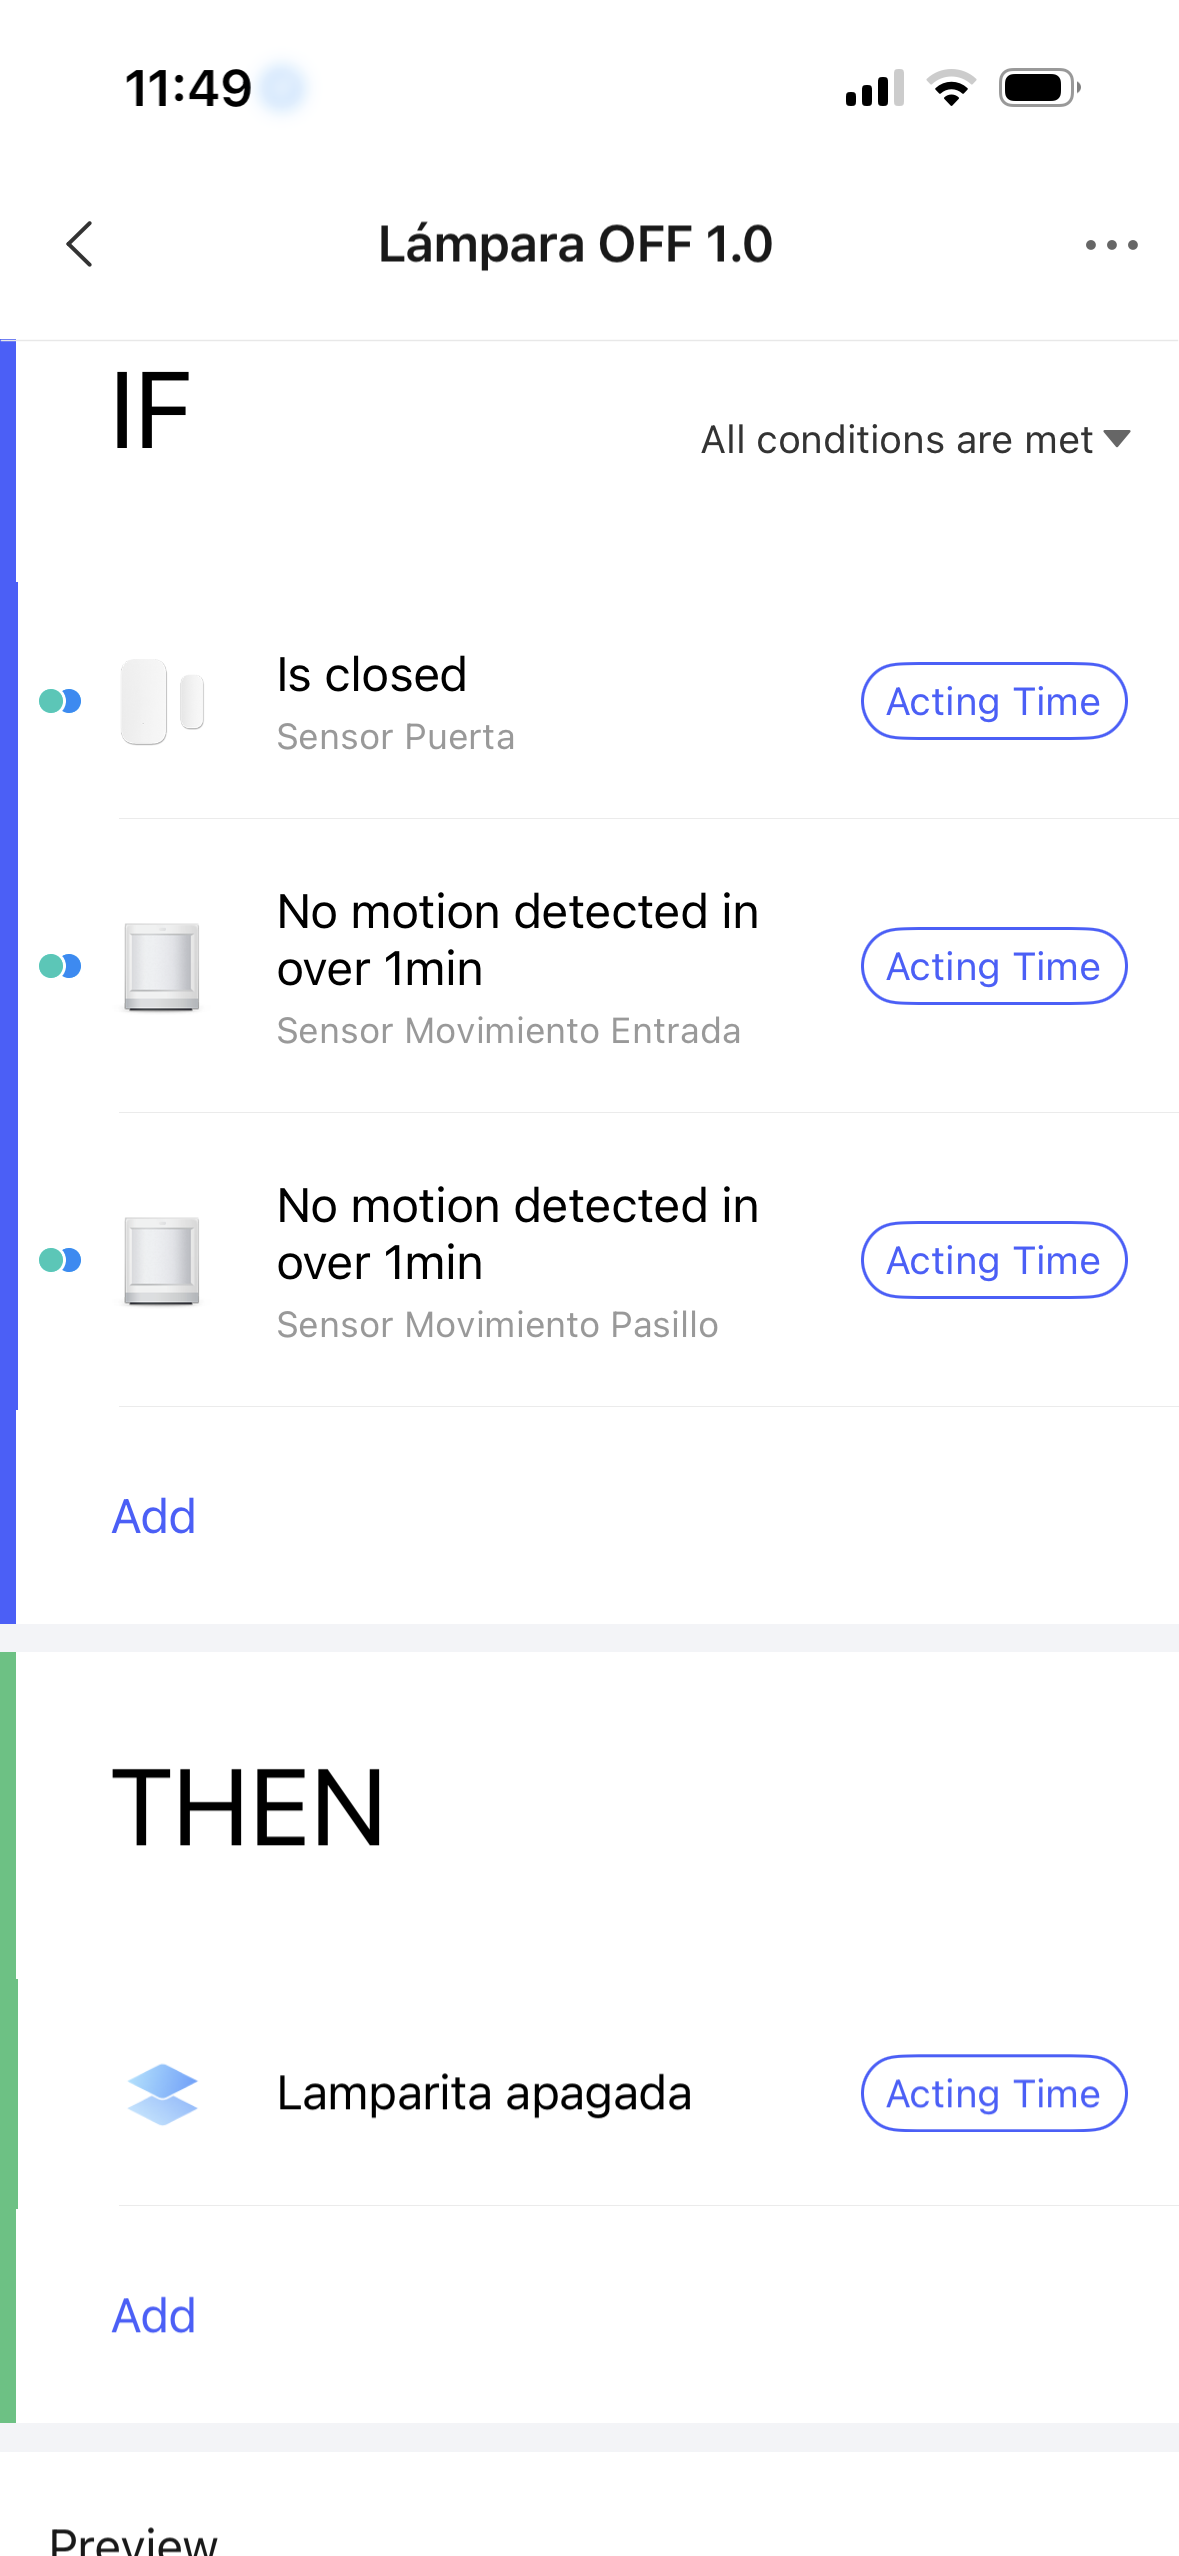
If (all of the following are met):

  • Sensor A detects no one
  • Sensor B detects no one

Then: Turn off the lights

Plain explanation:
As long as either A or B first detects “no one,” the system “wakes up” and checks whether both sensors are now detecting “no one.”
If yes, it turns off the lights.

14 Likes

Perhaps it would be good to explain how to distinguish between the two categories of conditions.

This could still be seen from the symbols in version 1.0, but it has been removed in version 2.0.

3 Likes

This is really useful and inciteful, thanks you for sharing this.

I actually think a sticky topic of common automations and how they are achieved would be useful for the whole community.

  • Motion lights with Lux as you have demonstrated is a common one.
  • Working periods for automations is another.
  • Sun Set & Sun Rise are another.

I have an issue with an automation that kept triggering the lights off from a voice switch turning on because the automation was incorrect as not motion was detected.

Thanks again for sharing

2 Likes

Thanks for the positive feedback and the new suggestion — really appreciate it. But I’m quite curious about the new question you raised. I’m not sure I fully understand what you meant.

2 Likes

In the Automation 1.0 design, we tried using color markers to distinguish between transient and state conditions — a green dot for transient conditions and a blue dot for state conditions. But in practice, during the Automation 1.0 phase, this color-coding turned out to be less important. Users were more likely to forget which color meant what.

Let me break it down more clearly:
Some triggers show only a green dot, meaning they can only be used as transient conditions.
Some triggers have both a green and a blue dot, meaning they can function as either transient or state conditions.
A very small number of triggers show only a blue dot — as far as I know, only things like “outdoor temperature above X°C or below X°C” fall into this category, where they can only be used as state conditions.

4 Likes

Okay, thanks for the explanation.

And how can users make a difference in the new version between transient trigger conditions and state conditions?

In fact, this confused me earlier, because you can select both types of conditions in the WHEN and IF statement. I seem to recall that at least two users had already asked about this.

2 Likes

In fact, in Automation 2.0, users don’t need to carefully distinguish which triggers are transient and which are state conditions anymore. As long as a trigger can be configured in the When or If section, it has already been filtered and validated by the system. As long as the automation can be saved, it will work.

The only exception is when a trigger fires too frequently. In those cases, changing the condition from something like “when X is above Y” to “when X rises to Y” usually solves the problem. But there are still a few scenarios where some additional manual adjustment is needed.

4 Likes

Okay, I think I understand now. The statements quoted do not necessarily refer to the distinction between the two categories of transient trigger conditions and state conditions. It probably means that you should define at least one condition in the WHEN and IF block. Is that right?

Yes,but actually users don’t really need to distinguish strictly between transient triggers and state conditions. They only need to understand the basic idea if they ever feel confused. As the interface guidance shows, When is required, and If is optional.

1 Like

Hi there. I have that same scenario (2 motion sensors to control 1 light) so I have set an automation as you explained in the section “A Special Case You Should Pay Attention To“. If I walk pass both sensors, after 1 minute the light turns off as expected. However, if I walk pass only 1 of the sensors, the automation won’t trigger. Am I missing something?

Hello, and welcome to the forum!
Could you describe your automation for turning on the light? The automation you mentioned only turns the light off.
It would be very helpful if you could provide a screenshot.

1 Like

Hi, @Mandy .
Thank you for such an extended explanation, I’ve been waiting for it for a long time. I can’t understand how I missed your topic, which was already described 12 days ago. I, for my part, supplemented my lesson 1 with such an addition.
Maybe you will have some corrections to it.
Thank you. Automation 2.0, lesson 1 (continued), description of the algorithm for transitioning automation 1.0 to 2.0

1 Like

For clarity, supplement this phrase with the text “the triggering time will depend on the data transmission conditions of the device (for example, a motion sensor that is set to detect motion every three seconds)”.

For understanding, please edit “As long as either A or B first detects (WHEN) “no one,” the system “wakes up” and checks whether both sensors are now detecting (IF) “no one.”
If yes, it turns off the lights."

1 Like

Hello, welcome to the forum.
If you made a sequence in the WHEN section, it should be. For the WHEN section to run the IF poll, it must be executed. You need to use any conditions in the WHEN section. In the IF section, you can only select the sensor state (no one has been present for more than X time.

1 Like

Thanks for your replies. Here you have the screenshots of the 2 automations (to turn on and to turn off the light). My objective is:

  • Turn on the light when there is any movement detected OR the door opens.
  • Turn off the light when there is no movement detected IF the door is closed (the light should stay on for as long as the door is opened).

I’ve gone through the automations countless times and I can’t find what’s wrong with them, but sometimes the light just doesn’t turn off. I’ve done some tests and it seems to happen when only 1 of the sensors detects movement (in the logs the movement detection is registered but after the 1 minute the light doesn’t turn off).


2 Likes

Hello, I recommend that you move the time restrictions to the THEN section.
In the IF section you have “doors closed” so that your automation works stably, this condition should also be moved to the WNEH section.


Check, this is how it should work. For a test check, remove the time restrictions, check the operability and then insert the time restrictions.

2 Likes

In this section, the solution I described is “the automation triggers only when both sensors detect presence.”
If what you want is “trigger when either condition is met,” then in the When section, simply set Sensor A and Sensor B to “trigger when any condition is met.” That will achieve the behavior you expect.

3 Likes

Based on my understanding, I interpret your point as

  • If Sensor A detects presence, Sensor B detects presence, or the door opens (an event), the light should turn on when any of these conditions occurs.
  • If the door is in the closed state, and both Sensor A and Sensor B detect no presence, the light should turn off.

Now, the trouble is when only 1 of the sensors detects movement, after the 1 minute the light doesn’t turn off. But this contradicts the outcome you said you expect, so could you describe your current pain point again?

2 Likes

Hi Mandy. You described the behavior I expect correctly. Let me clarify the problem:

The sensors are installed in an L-shaped corridor (that’s why I need two sensors). If I walk along the entire corridor and both sensors detect motion, the light turns off after 1 minute, as expected.

However, if I walk through only one section of the corridor, so that only one sensor detects motion, the light does not turn off after 1 minute. Instead, it just stays on.

At this point, and after some more tests, I think the issue might be a bug in automations 2.0 or even a faulty sensor (for example, the sensor may not report inactivity unless it first detects movement?). In the end I recreated the automation using automation 1.0 and it is working flawlessly.


(I am attaching an screenshot)

1 Like