Good afternoon, today I want to conduct training on creating automation for controlling the temperature in the room.
Introduction.
I want to start the lesson by explaining the types of heating systems in houses. Such an explanation is needed to distinguish automation in relation to the types of heating.
“A” - a type of heating that works centrally for a group of houses, apartments. Such heating involves the supply of coolant (water, steam) from one point (boiler or other source) to a group of consumers. In this type, there is no feedback house->boiler, this means that your house always has a hot pipe that is ready to heat the room.
“B” - a type of heating that works according to the system of an individual boiler in the house but has a so-called bypass, a tank with heated water. This tank is covered by a heater (gas boiler, electric, heat pump …). The tank heating system is individual and works in a pair of heater->tank bypass. Hot coolant is supplied to the room at any moment when the radiator requests it.
This system also includes a type where the heating boiler has a water circulation regardless of whether all batteries are closed or not. In such systems, it is not scary if all radiators are closed. Water circulation continues, and the boiler controls the water temperature in its internal control. This is the so-called heating modulation work (the boiler power increases (decreases)) according to the set parameters.
“C” - type of heating in which an individual boiler requires a start/stop signal. This type of heating is sensitive to the disappearance of circulation. The disappearance of circulation can lead to a breakdown of the heating boiler. For this reason, it is necessary to create automation that will ensure that the boiler stops before the end of the heating process of the heat exchange means (battery, underfloor heating …)
Now let’s draw conclusions.
To put it very roughly, heating systems “A” and “B” are equivalent in terms of the principle of heating the room. These systems have their own type of automation.
For system “C” there is a completely different approach to automation.
1. Automation for systems “A” and “B”
The first automation option is to use the built-in smart schedule systems that are built into the E1, W500, W600 devices. I will not describe these smart schedules. This is the topic of a separate section.
The second option is the smart schedule that I described in lesson 10 ( Automation 2.0, lesson 10, room climate control. Creating a smart heating schedule for radiator thermostats (E1, W500, W600) ). This schedule is flexible, its disadvantage is that it is only suitable for devices that can set a controlled temperature (E1, W500, W600).
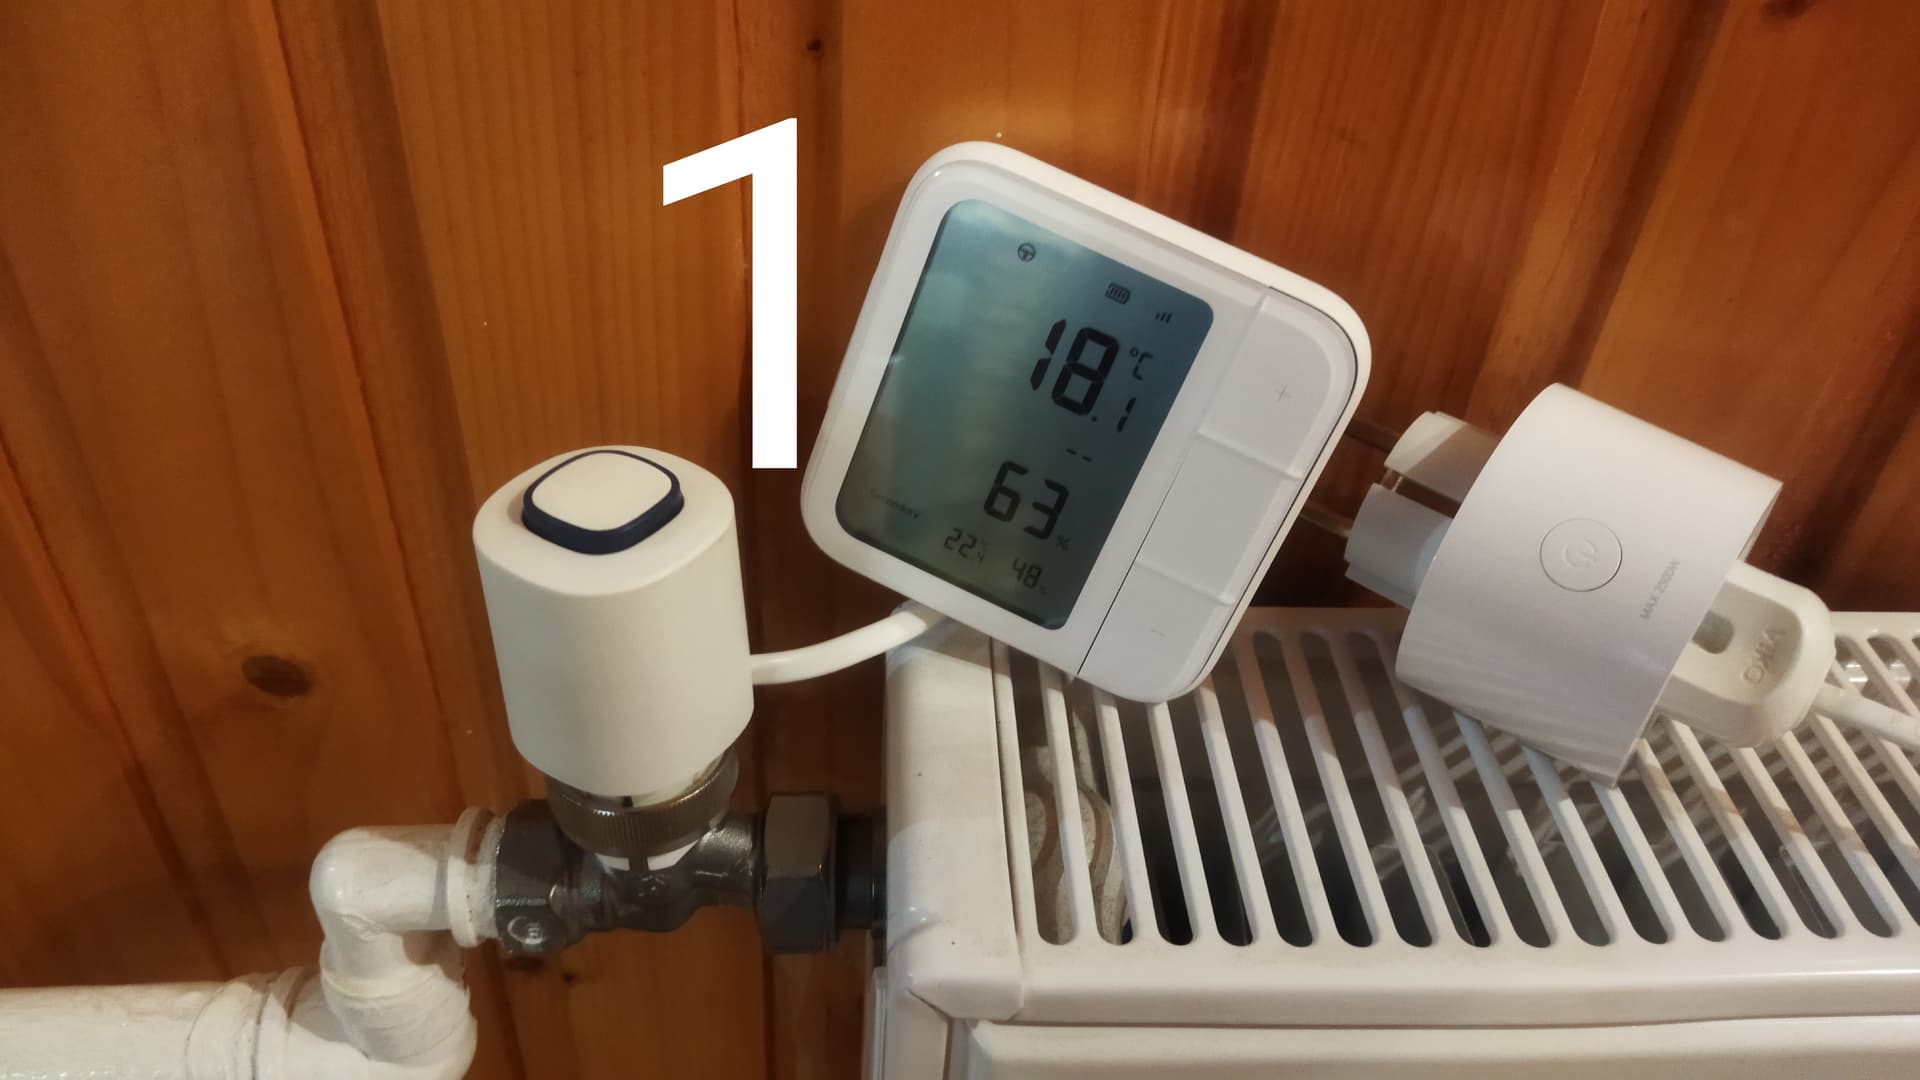
The third automation option for a control complex consisting of the following components:
- temperature sensor (W100, Aqara quadratic sensor, F300…);
- smart socket (T2, Aqara relay of the old type);
- thermal valve (closes/opens when voltage is applied/removed);
Fig.1.
Our task, temperature control.
The temperature condition in the room
- from 23.00-06.00 18°C-18.5°C,
- from 06.00-23.00 20°C-20.5°C.
(so as not to overload the lesson, I took only two periods)
FIRST METHOD OF AUTOMATION.
1.Turning on the heating.
We make automation with the condition of turning on the relay when:
- from 06.00-23.00 Ta<20.0°C;
- from 23.00-06.00 T<18.0°C.
The name of the automations will be
1 Lesson 11 On 06.00-23.00<20.0°C
2 Lesson 11 On 23.00-06.00<18.5°C
Fig.2,3
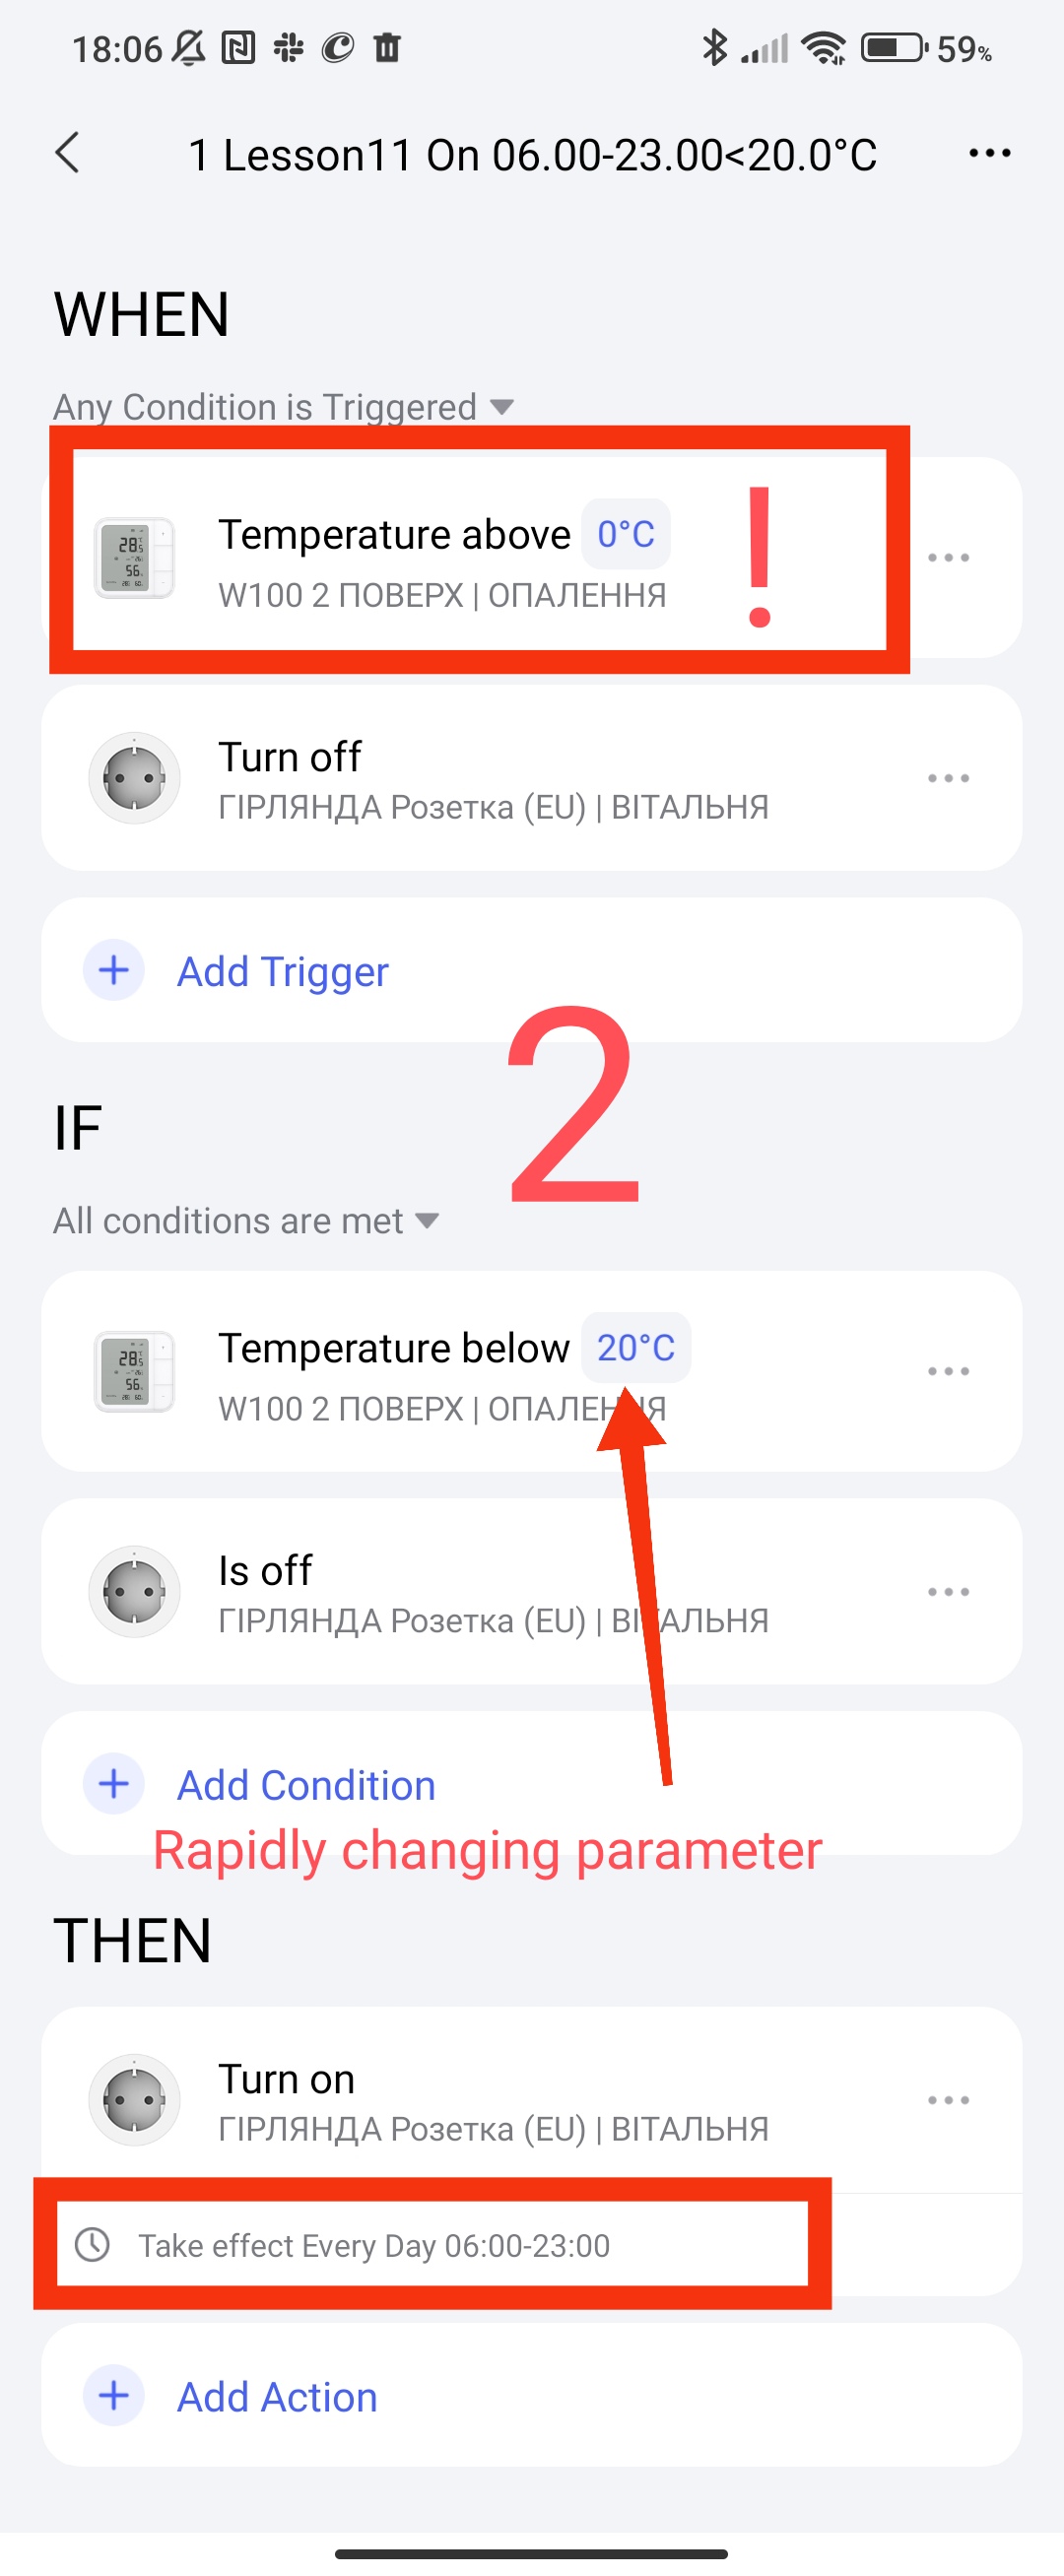
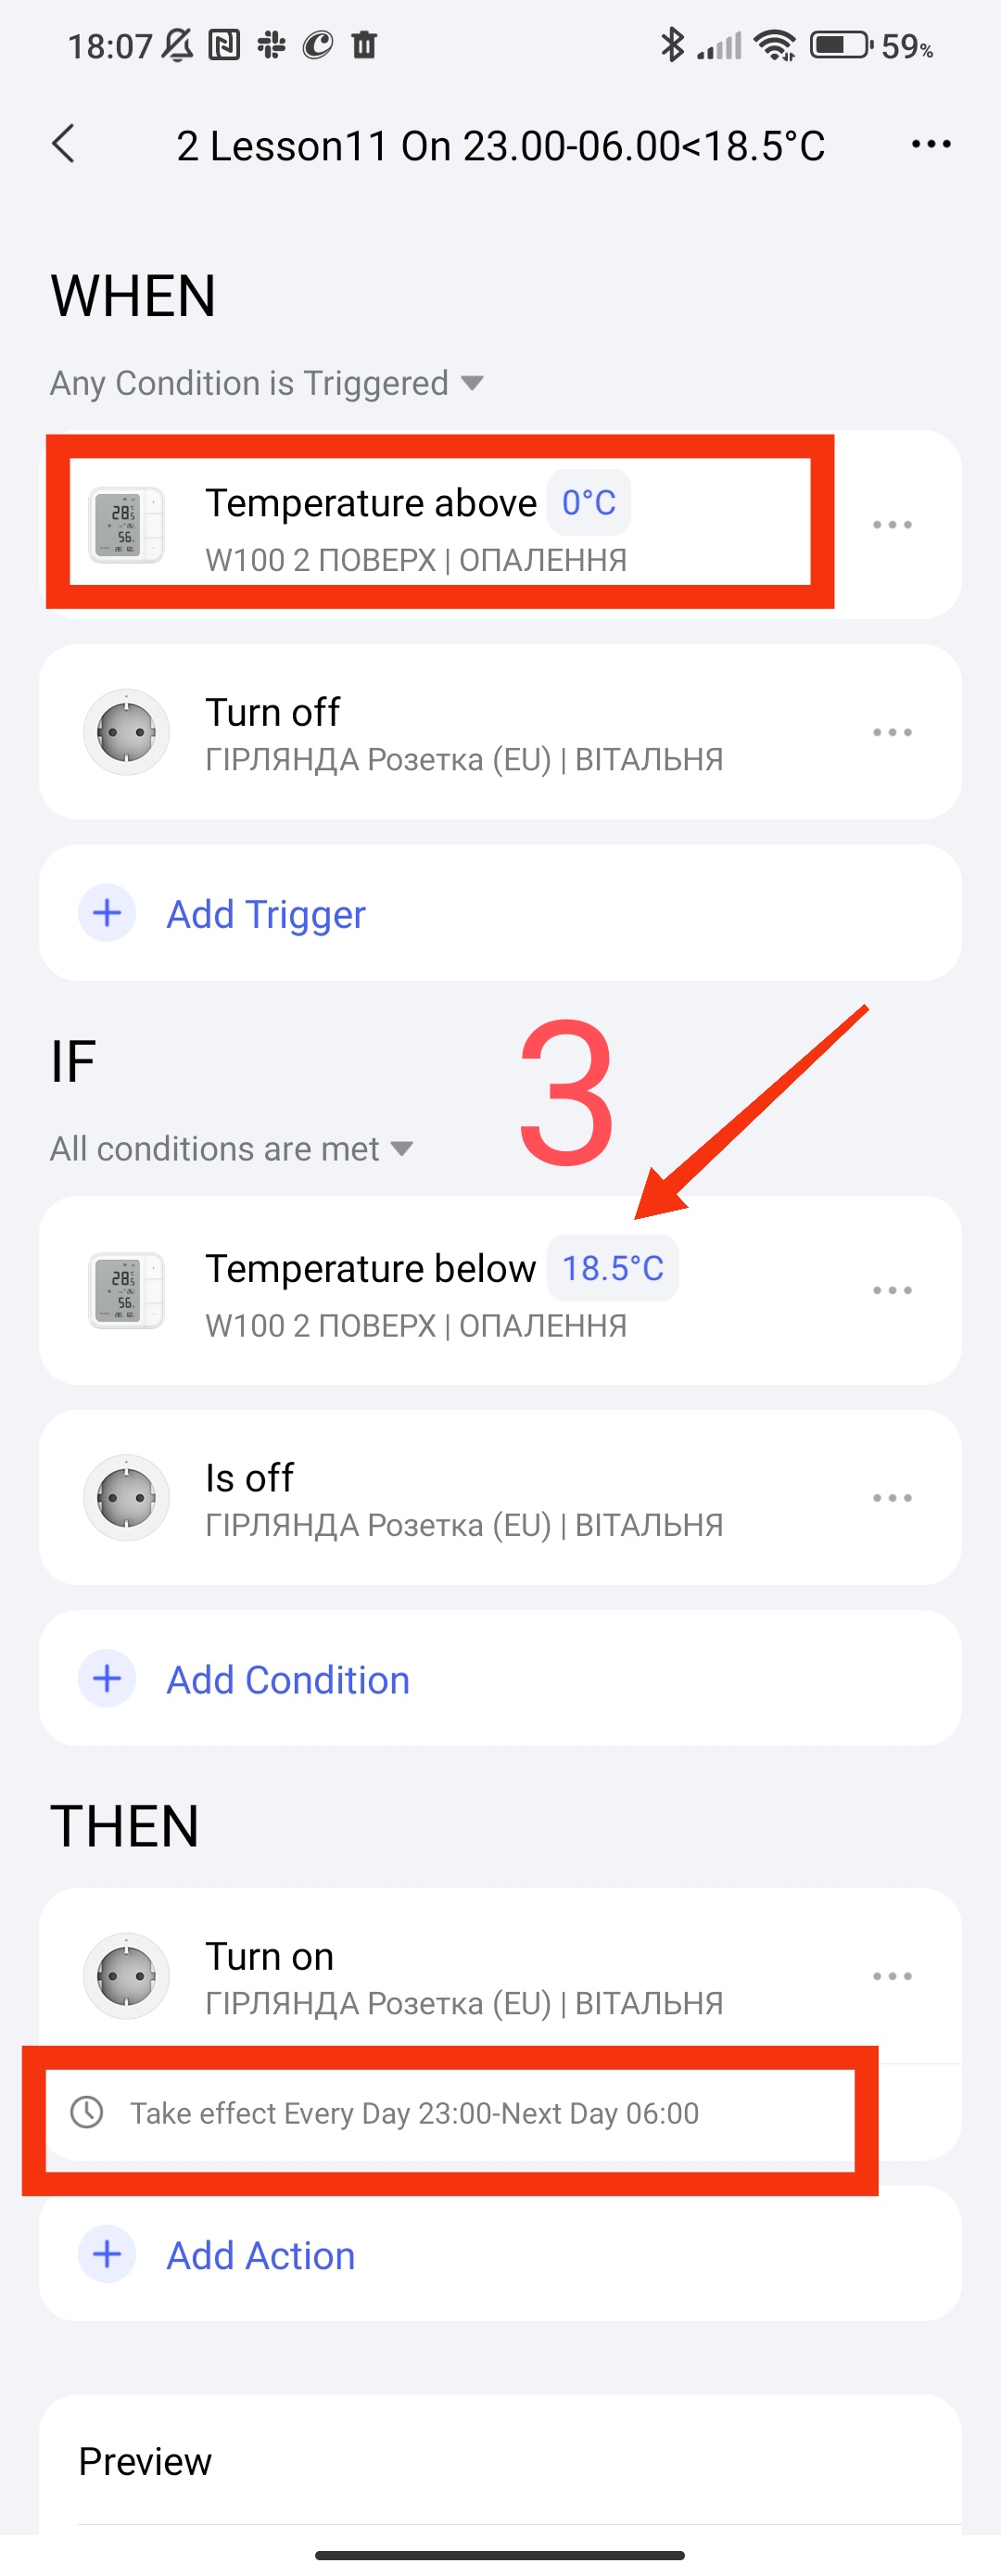
Explanation of work.
- In the WHET section, we specifically set the temperature condition that is constantly met. According to the explanation of the Aqara specialist ( Automation 2.0 problem - #3 by Mandy ), the WHET section sends an IF poll (this section is an analogue of IF from 1.0). This condition is a trigger that is periodically sent from the temperature sensor, it simultaneously (in parallel) monitors the condition in the IF section, that is, constantly (within its settings, W100, square sensor… make a report to the gateway (send a signal)), which means that at this moment it checks the triggering conditions.
- In the WHET section, we set the condition of the switched off socket, this is done to instantly turn on the socket again, in the event of an external heating shutdown. With this action, we ensure reliable heating of the room, even if someone turned it off by mistake or for another reason.
- In the IF section, we set the temperature control condition at which the system will trigger the triggering. Also, with this arrangement of the condition, it is very easy to adjust the control temperature in automation (just select the box and adjust).
- In the WHEN section, we set the period of operation of the smart socket.
ATTENTION. As always, I recommend taking the automation name seriously, this name will always help you understand the essence of the automation that took place in the automation log. Also, the name will help you always remember why you created it (after 1 or 2 years of work), time flies quickly🙁.
Also, don’t forget to add your automation to a group (I have a “heating” group). I can always open this group and get to all the automations related to it.
2. Turning off the heating.
We make automation with the condition of turning on the relay when:
- from 06.00-23.00 T>20.5°C;
- from 23.00-06.00 T>18.5°C.
The name of the automations will be
1 Lesson 11 Off 06.00-23.00>20.5°C
2 Lesson 11 Off 23.00-06.00<19.0°C
Fig.4, 5
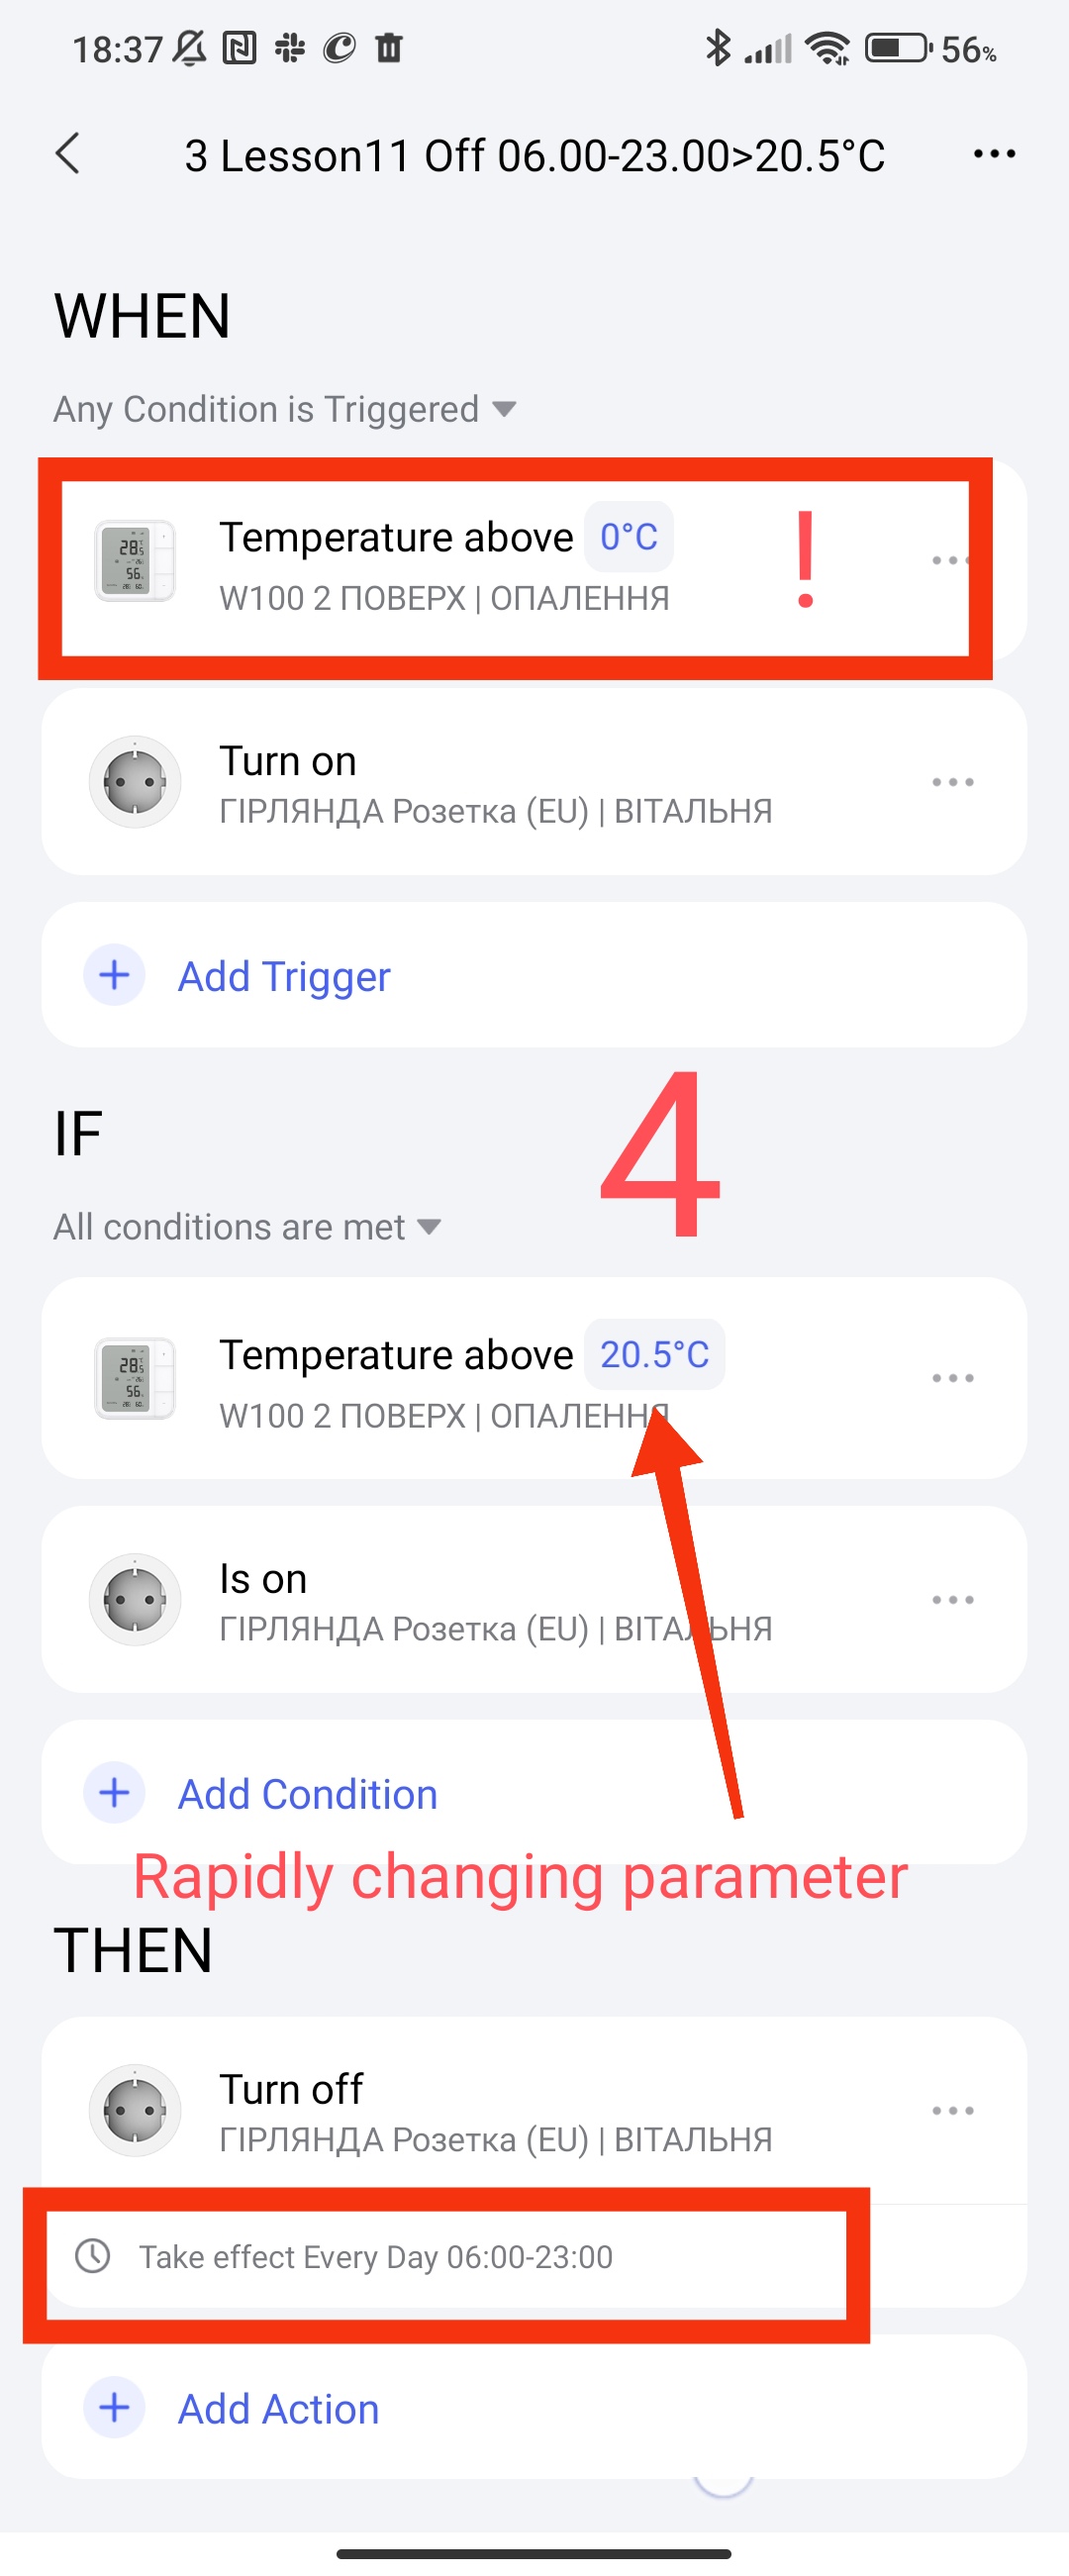
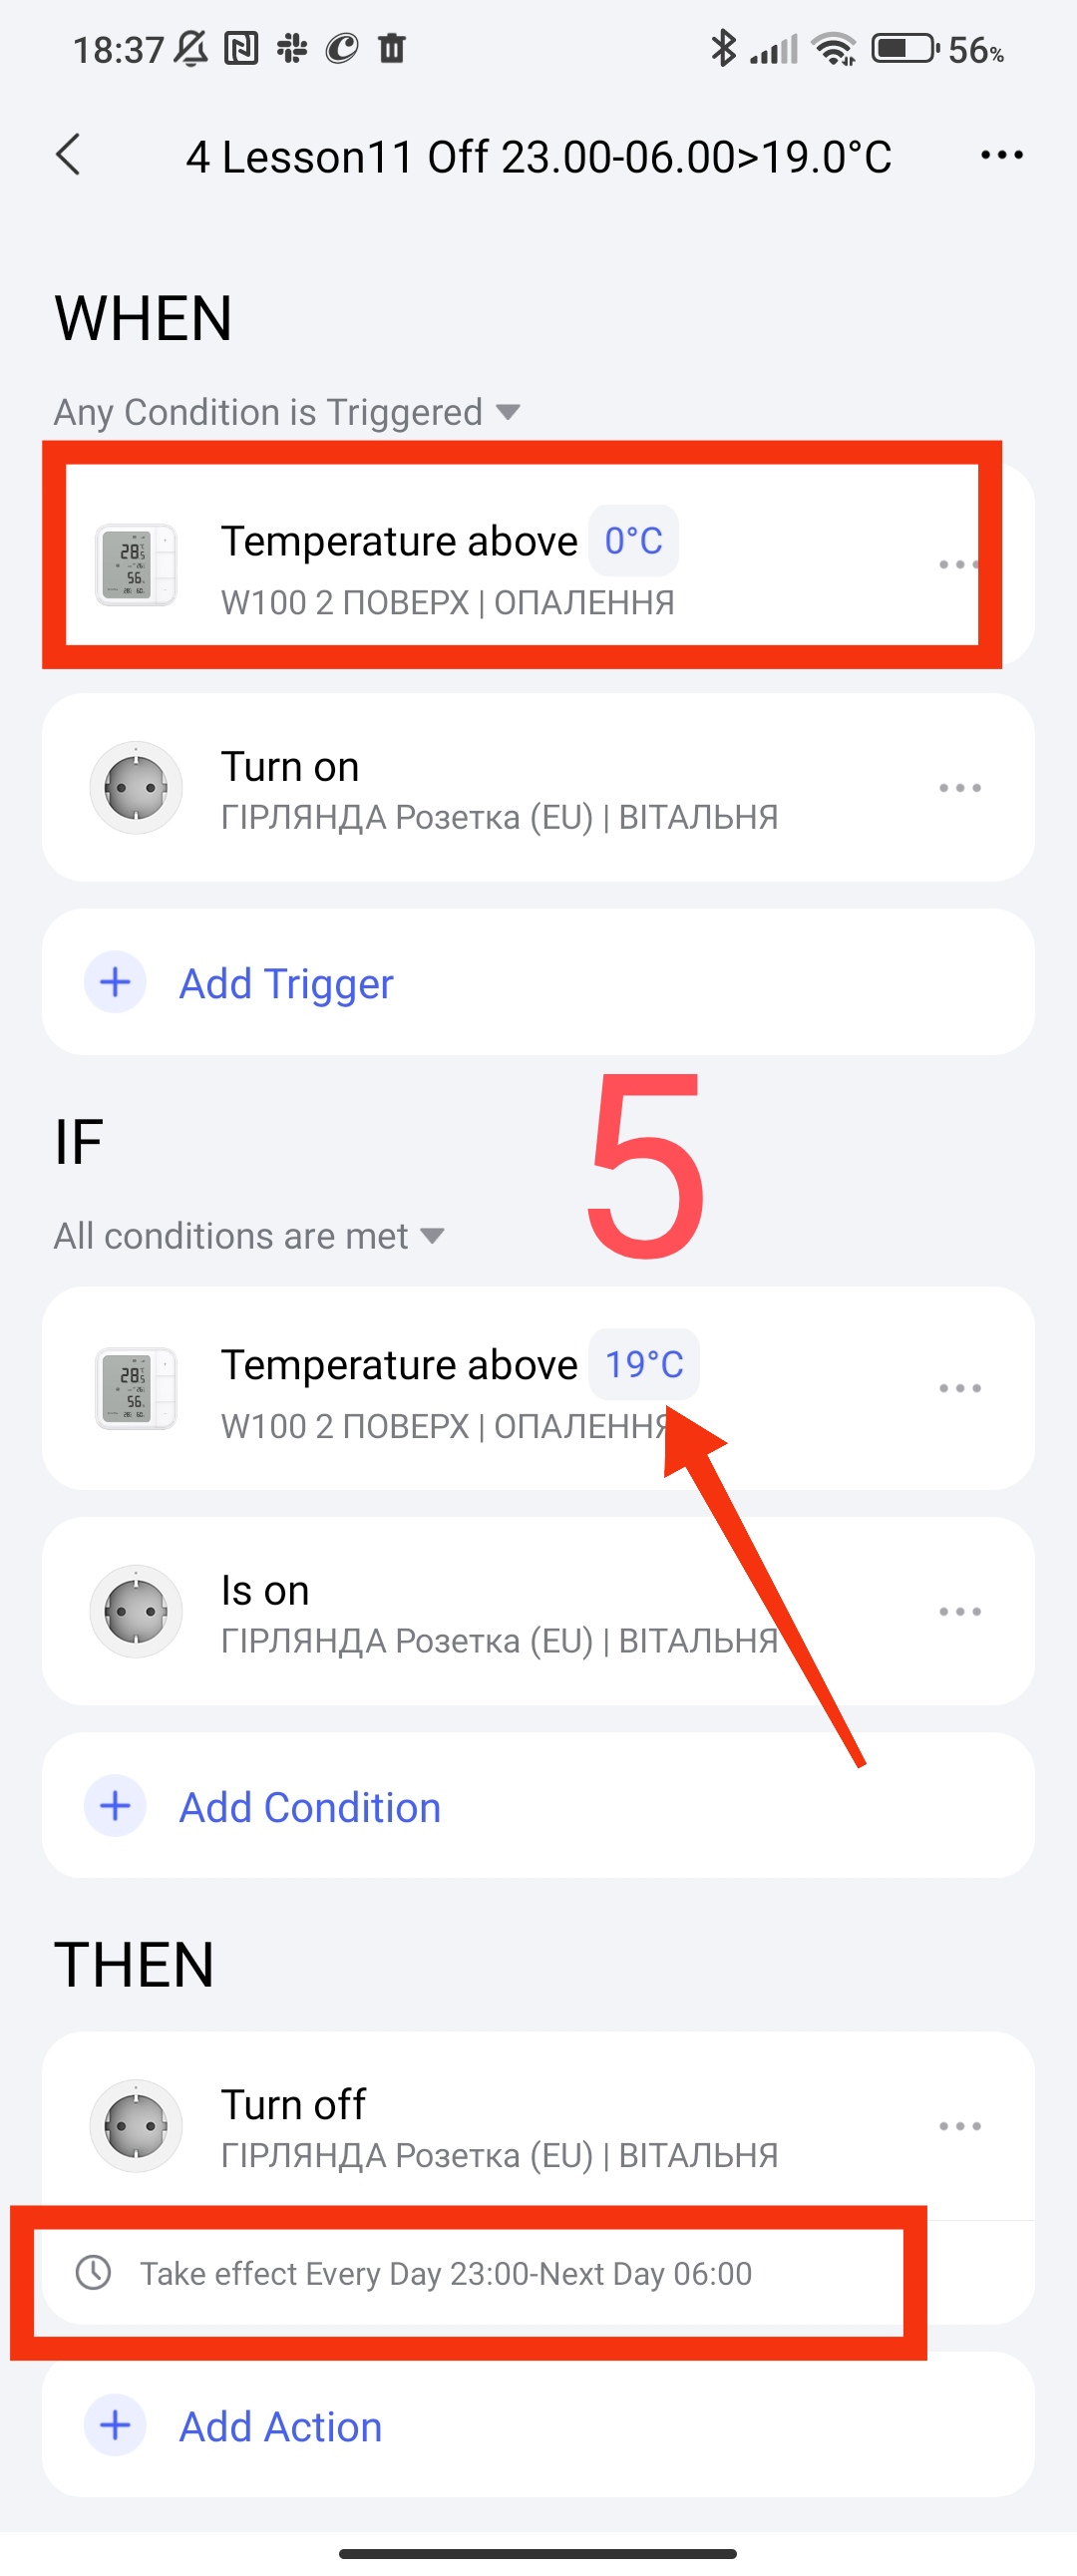
These automations have the same description as the automations for turning on, I will not repeat myself.
SECOND METHOD OF AUTOMATION.
This method of automation is based on combining heating time periods into one automation. We enter temperature parameters relative to the time interval that we need to control.
The disadvantage of such automation is the lack of protection against accidental switching off (on) of the socket. If for some reason the socket is switched off (on) at the time of heating (cooling) of the room, it will work again only after the trigger is restarted. The start (stop) trigger operation will depend on the moment at which the start (stop) occurred. I will not delve into the conditions of these processes so as not to burden you. But I assure you, everything will work only with a certain delay. This delay will be within the heating/cooling that we have programmed.
So that you do not go to the top of the text, I will remind you of the conditions again.
1. Turning on the heating.
We make automation with the condition of turning on the relay when:
- from 06.00-23.00 Ta<20.0°C;
- from 23.00-06.00 T<18.0°C.
The name of the automations is called
4 Lesson11 On <18.5°C_<20.0°C
Fig6.
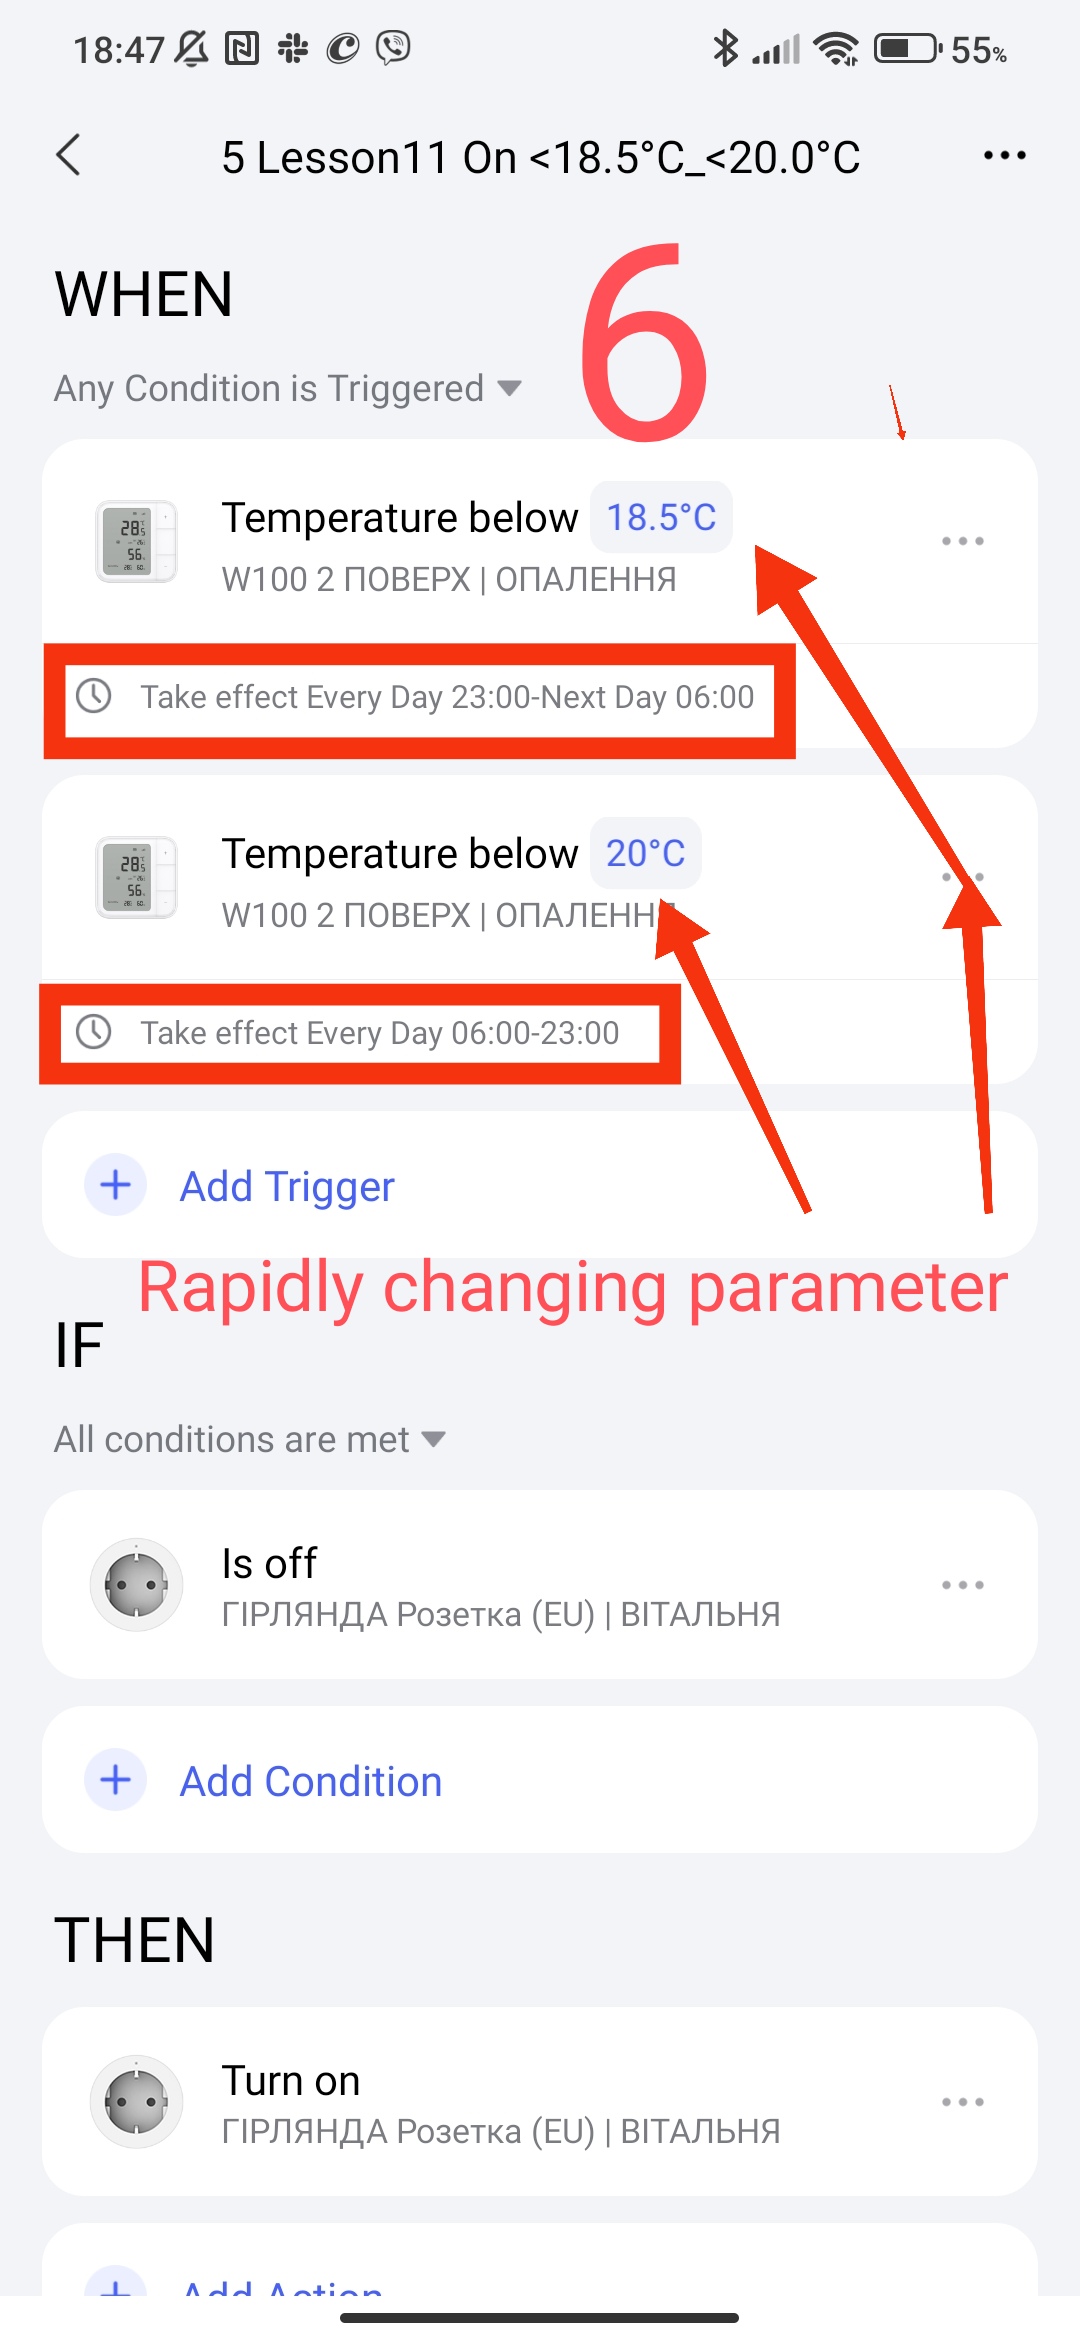
EXPLANATION OF WORK.
In the WHET section, we enter the control parameters (2 triggers according to the conditions) and through the “…” option, we set the period of operation of these conditions according to our parameters.
In the IF section, we enter the condition of the switched off socket so that our automation does not constantly trigger (spam). At the time of heating (time period), if there is no this condition, our automation will constantly trigger the socket to turn on.
In the WHEN section, we start (turn on) the socket for heating.
Please note, here we do not set time restrictions as in the first automation example, the restrictions are set in the WHET section.
2. Turning off the heating.
We make automation with the condition of turning on the relay when:
- from 06.00-23.00 T>20.5°C;
- from 23.00-06.00 T>18.5°C.
The name of the automation will be
6 Lesson11 Off >19.0°C_>20.5°C
Fig7
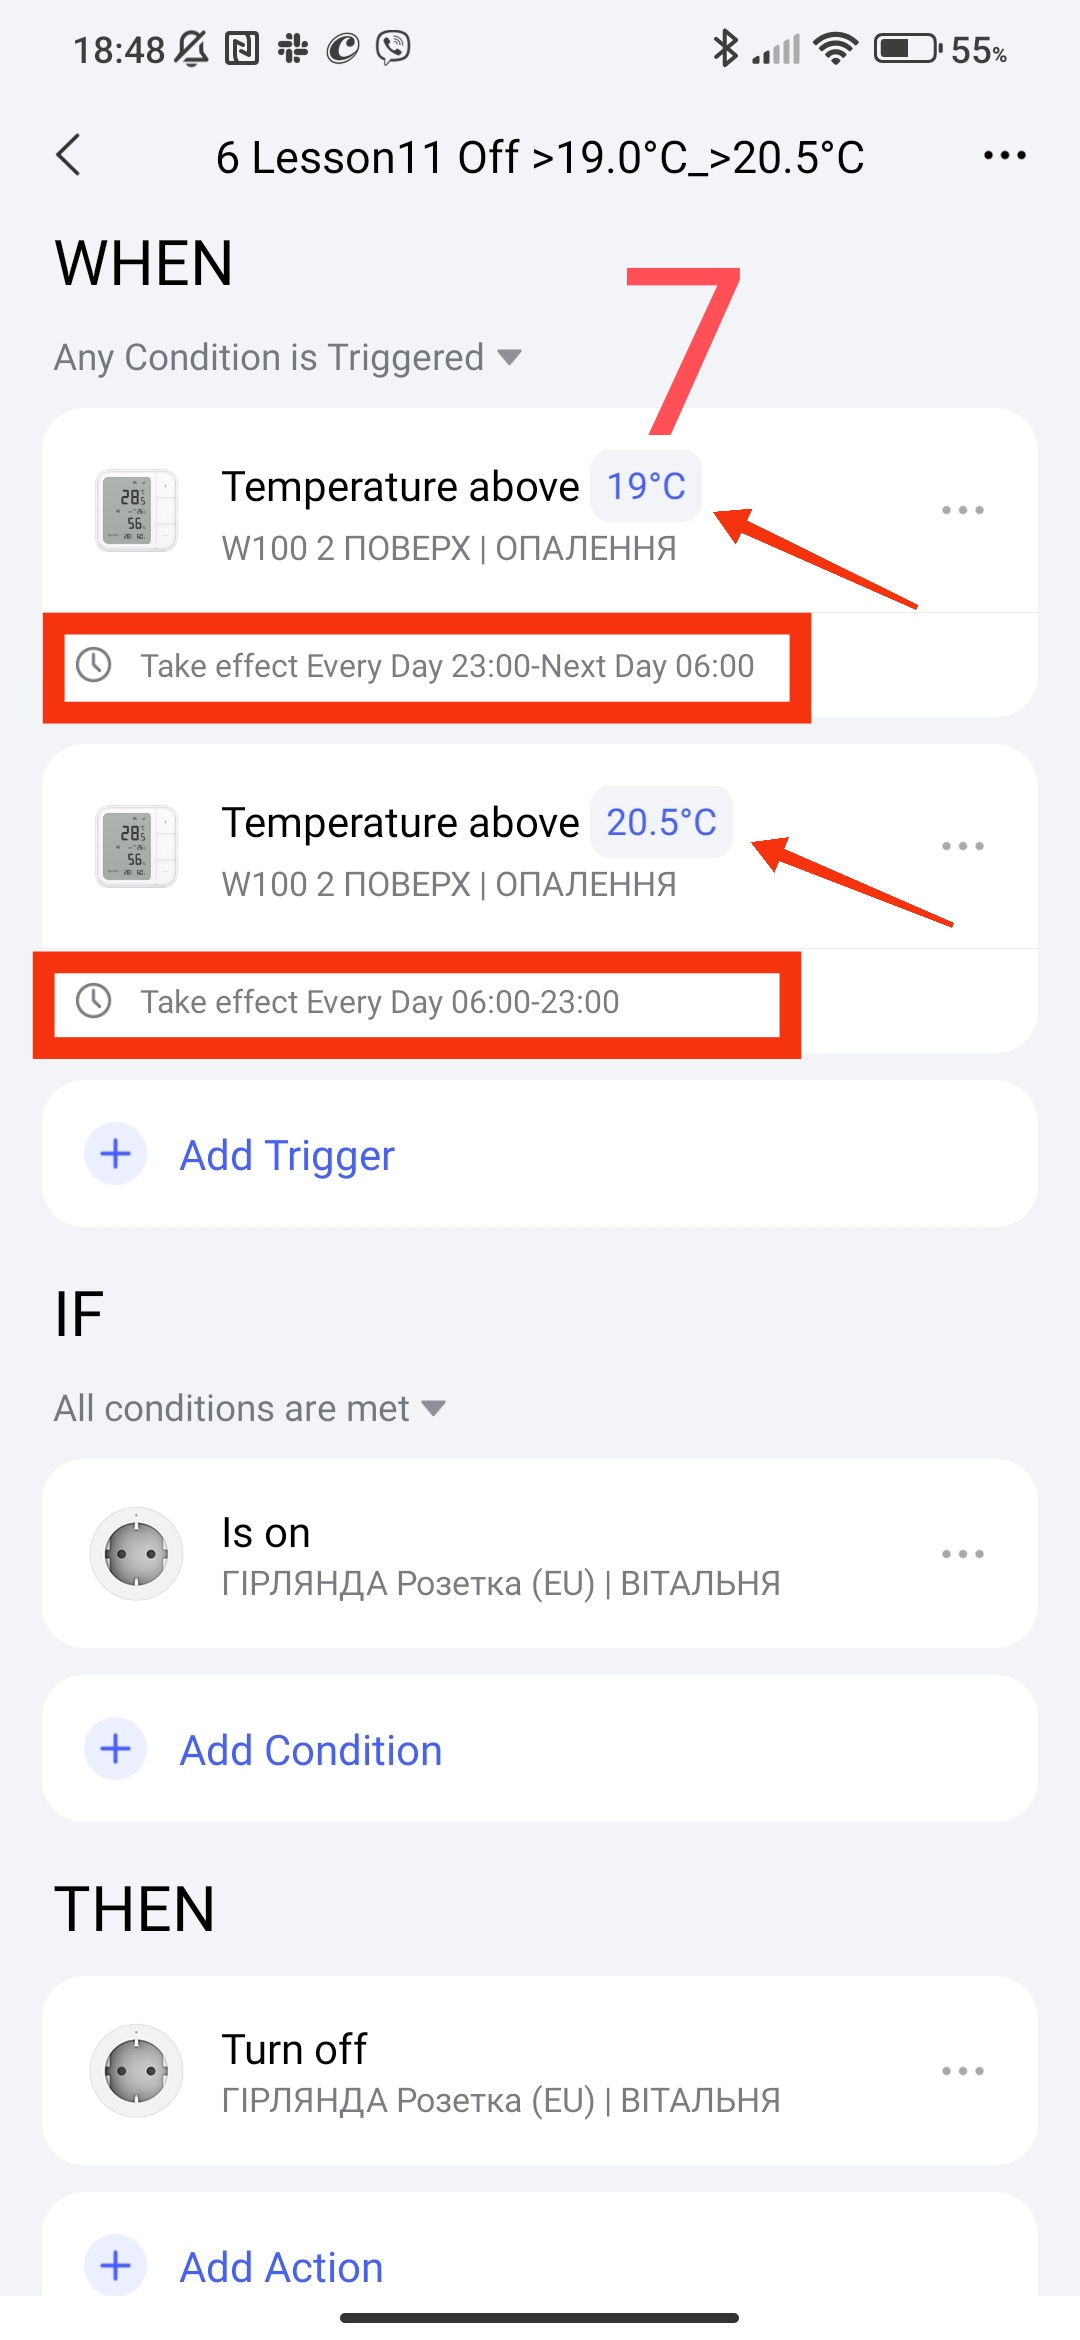
This automation has the same description as the automation for turning on, I will not repeat myself.
These automations work in my house and have been tested for operability.
This concludes the current part of the topic about temperature control in the room.
Thank you for reading and sharing the topic (you can also on other platforms with a link to our forum).
More to come.
Lesson12 Automation 2.0, lesson 12, blitz topic, VIRTUAL Aqara switch